
Last week, with over 15" of snow on the ground, I thought that it was a good time to experiment with some snow dyeing. It's always an experiment because I never know for sure how the snow that I happen to have that day, will work with the fabrics on hand.
I do the dyeing in our farm shop which is heated at about 50 degrees, so, it takes about 24 hours for the snow to melt, depending on how wet the snow is. This snow was pretty dry and about 6 hours after I got everything into the pans, I ended up spraying them with water to get the snow to melt and produce more liquid. They dyes weren't getting to the bottom of the pan.
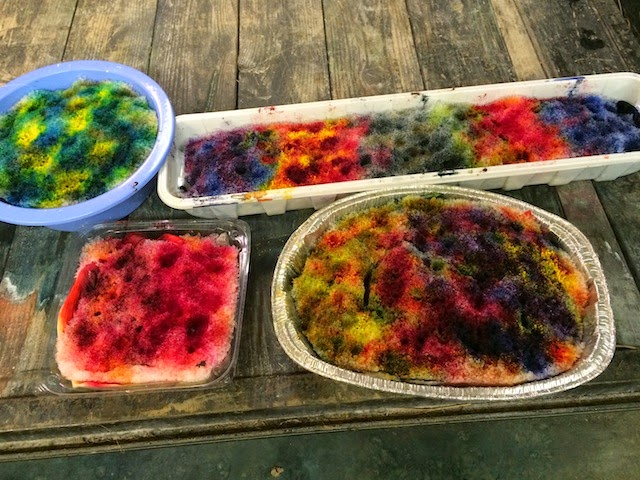 |
| Snow starting to melt on first group of fabrics |
The first batch that I dyed had some wonderful pieces and some not so wonderful pieces in about equal proportion. I used base fabrics of cotton sateen, a silk/cotton blend, a silk/linen blend, and two 45" by 54" pieces of silk velvet.
The velvet pieces are in the long wall paper pan. Since I used the same colors on both pieces of fabric, they turned out pretty much the same. Here's the piece that I like the best:
 | |||
| Silk velvet |
The blue and green dyes really saturated the fabric. I was very surprised when I saw how dark they turned out. I did get a crystalline effect on the middle portion of the fabric. The other piece turned out even more saturated with color.
Here are some of the pieces that really showed a crystalline effect.


Some of the red pieces tended to take the dye almost in a solid fashion as did some of the blue pieces.
TWO DAYS Later:
The snow is melting in places and icing over again at night. It's great snow man snow once you break through the icy crust.
I ripped up 10 yards of fabric using silk/linen and silk/cotton blend fabrics as the base fabrics.
The pieces were about 36" by 22". I noticed that I got the best results, in the first batch, on the smaller pieces.
This time, I put each piece in it's own pan. The pans are a collection, from years past, of taking home left-overs from local Mexican Restaurants. I folded and manipulated the fabric pieces and then placed them in the pans. The dyes were set out according to color, each with it's own marked spoon.
 | |
| Fabrics in pans ready to add snow. One of the pans is already packed with snow. |
The snow was the kind that packed really well. I used 1 1/2 five gallon buckets of snow. I patted it down on each pan until it was almost solid. Then I added the powered dye colors. NOTE: Be sure to wear a mask when working with the dyes.
Pans filled with snow and dye powders sprinkled on top.

 |
| Snow melted and fabrics are ready to wash out. |
The fabrics are a lot easier to rinse out since a lot of the excess dye and liquid are on the shop floor instead of in the fabrics. I hand rinse them in the big wash tub sink that is in the shop bathroom. I collect all of the rinsed pieces in a five gallon bucket. I then carry the bucket into the house and load all of the fabrics into the washer, add about 1 tsp of Synthrapol and wash everything on hot.
After drying all the fabrics, I iron each piece, because that's the best way to see all the patterns that were created by the melting snow and dye.
 |
| Ready to iron. It's handy to have a good audible book to listen to. |


Some of these pieces will be quilted as whole cloth quilts and most likely have surface beading added to them.
If you don't have any snow, these results can be obtained with using ice. I used the snow because it was here and it was free. Out of two different dye batches, I've ended up with about 20 yards of dyed fabric. To dye that much fabric using ice would be time consuming if you are freezing your own ice or expensive if you buy the ice.
I think I have enough fabric to keep me busy for awhile.
Creating Always,
Karen
No comments:
Post a Comment