Thursday, September 27, 2012

ANGELINA LEAVES

If you want to experiment with making angelina leaves, using real leaves, then, now is the time to do it.  The leaves are tough enough to stand up to being ironed and make good impressions in the angelina fibers.  Here's how to make the leaves.

I like to knead at least 3 colors together. It gives an added depth to the leaf.  Here I've used a light and dark blue with some silver.
**********************************************************************************

Be sure to place the leaf vein side down on the fibers. 

There should be extra fibers poking out from the edges of the leaf.  You want to make the fiber pile as even as possible in thickness.  I go for pretty fluffy all the way around but experience will teach you what is too thick and too thin.
***********************************************************************************

Slide a slightly warmer than cool iron over the parchment sandwich. Lift the top parchment piece and check to see if the fibers bonded to each other. If not, slide the iron over them again.

 Be sure to always slide the iron over the parchment sandwich. Never let it sit on top of the fibers. You will burn them.   Flip the sandwich over and repeat the ironing on the reverse side.
***********************************************************************************


Here is the leaf ironed over the fibers. Carefully pick up the leaf  and bonded fibers and check for thin places in the fibers. If there is a thin place, add a little bit of the angelina fibers to it, replace the parchment paper and iron again.
***********************************************************************************

Now, carefully trim the excess fibers from around the leaf.  The leaf will not be bonded to the fibers so you may have to pin it in place. Normally, I just hold the leaf in place while I trim around it.
Sorry for the fuzzy photo. I haven't figured out how to trim and take a picture at the same time.
***********************************************************************************

 The angelina leaf is now ready to be used as an applique on your art quilt or clothing, or made into a curly leaf using Tyvek ( more on that when I get someone to take photos of the process).

Silk leaves and leaf patterns made out of freezer paper can also be used if you do not have a ready supply of natural leaves or there is 2 feet of snow on the ground ;-)

Of course, you can make all kinds of patterns using freezer paper - fish, dragonflys, butterflies, flower petals - just let your imagination go.

One more thing to remember. Save the pieces of bonded fibers that were trimmed away from around the leaf. They can be teased apart and used again or cut into pieces and bonded to other angelina scraps.
***********************************************************************************

 SUMMER"S GLORY 2008
 For more information on using these wonderful fibers and to purchase them, go to:
http://www.embellishmentvillage.com/store.php?cat=3


Thursday, July 5, 2012

LEMONADE SHIBORI RESULTS

Here are the results of my first experiments with Shibori Painting using Dyna-flo paints and cotton and silk fabrics. Letting the fabrics dry out in the hot sun worked like a charm, even on the very heavily folded silk scarf.


  I love this first scarf. 
Of course, it took the most time and I think it shows.
I stitched meandering folds into both ends . Then, working toward the center, I tied in marbles using rubber bands. the final center was pleated and stitched closed.
The fabric is silk chiffon. I am going to try this on heavier silk and see what happens.

 This scarf was pleated, folded and rubberbanded. Apparently, I did too much folding. The fabric was too thick for the paint to penetrate all the way through. I still really like it and will probably do some further embellishing on the plainer areas.
 This is a 12" square of cotton. I just tied lots of marbles into it. I used 2 differnt colors of paint. One on top of the marbles and one brushed into the folds.
It's amazing how the colors changed.
 Another 12" square that I pleated, folded and added rubberbands. There's a lot of subtle shading going on with this one.  At first, it looks really linear but there's more to it.
 I love this one. I'm going to try to repeat this but have it more even.
 Again this piece was folded and then I used rubberbands to create sections that were individually dipped into the paint.
 I hand stitched folds into this one. I surprised by how subtle the design turned out. I'm trying this technique on another piece but making the lines more random.
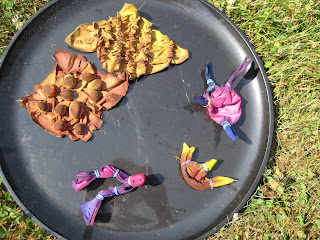
Here are the above pieces, drying in the sun. Don't look kind of cute?


Last but not least, this is the cloth that I used to clean up the table after dyeing each piece.  I am really loving these Dyna-flo paints.


There's more to come. I have another tray of little pieces and another scarf drying right now.

Check back soon,

Oh, Be still my beating heart, the sky just clouded over! If it actually rains, you'll hear the screams of joy all over.

Karen

One last thing, there is a comment section, so, please, if you have anything to say, please leave a comment ;-)

Wednesday, July 4, 2012

MAKING LEMONADE SHIBORI

I've heard some say " When life gives you lemons, make lemonade". Well, of course, that will only work if life also  gives you the sugar.

Right now, life is giving me lemons in the form of this dreadful hot and dry weather. Since I have the sugar ( lots of fabric, studio space and paint), and, the shibori pieces need to dry completely before being unwrapped,  I've decided to take advantage of the hot, dry weather and experiment with some shibori painting and see how quickly I can get it to dry.

I used some cotton squares and silk chiffon for the experiment.

Here are some photos of the cotton and silk pieces with sewn areas, captured marbles and tied with rubber bands.


I don't know if these are conventional folds or not. I just figured it wouldn't hurt try several different ways and see what happens.

The Dyna-flo paints were mixed with water at a 50/50 ratio.  I then dipped some of the pieces into the paint. On some of the other pieces, I used a large brush to cover all the areas.  All of the pieces were dipped or brushed with at least 2 colors. Some of them more. 

Here's is the marble piece just after I've painted the marbles with the sulphur green. I did use a brush on this one since it would be too awkward to dip it. I then added the umber to the base fabric.


Here they are drying out in the sun, after having sat all night in the studio.


 Notice how the colors are changing as they dry.

This looks to me like it is going to be so much fun and I can hardly wait to see what they are going to look when they are unfolded and pressed.  I think the chiffon will be a fun summer scarf and I can hardly wait to use the other pieces in a quilt.

Check back here for pictures of the finished fabrics.

Surviving the heat so far and building up muscle hauling water,

Karen

Friday, June 22, 2012

QUILT DESIGNED ON THE COMPUTER

I've just finished my first quilt, called "COME TOGETHER" that I designed on the computer.  I used a program called "EazyDraw".  The video tutorials made it easier for me than I thought possible.

Here's the drawing that I used as a pattern.  I used a digital projector to get the pattern projected onto a sheet of freezer paper. I then traced the pattern onto the paper.  Once I had the pattern drawn onto the freezer paper, I then placed it under a light weight piece of white cotton fabric. I then redrew the pattern onto the cotton. Each pattern piece was then pinned to the white fabric to ensure proper placement. Even at that, I had to constantly work with the colored pattern to make sure the placement was correct.


Here's a photo of the cut out pieces being pinned to the white background. Each piece  had Misty Fuse on the back of it, but, I did not fuse any of the pieces until I had everything pinned into place. I did the final fusing while the whole piece was pinned to the design wall.

You can also see in this photo, that additional design elements are being added to the original design. Of course, the colors are also changed due to the fabric selections.


 I used Quilter's Dream Orient batting which is a blend of silk, bamboo, Tencel and cotton. I really liked the look of the quilting with this batting.

After quilting the whole piece, I started adding in  embellishments.  The embellishments, which are glass, natural stones, butterflies, turtles, swallows, etc,. add to the organic/feminine theme of the quilt.


 Viola! The finished quilt.  It will be part of the Quilt Artisans of Kentucky "Quilts with a Kick" Exhibit which can be seen July 6, 2012 through August 25, 2012 at the Berea Arts Council Gallery in Berea, KY.


Until next time,

Happy Creating,
Karen


Friday, March 23, 2012

MOUNTING ART QUILTS ON CANVAS -PART 3

Despite the fact that I've been doing the gardening work of March, April and May all in the past week, (if not in reality, it at least feels like it with the super warm temperatures we've had,) I did manage to get 2 more small Art Quilt pieces mounted on painter's canvas.

Again I painted the canvases with Jaquard Lumiere paints. 
     "THE LAC"
This canvas was painted and then further embellishment was added using a black pigma pen.  Again, I have sewed the quilt onto the canvas. I think it makes for a nicer piece that won't sag or bag, especially in humid weather or as time goes on.  The canvas size is 8" x 10". 

*********************

 "DIAMONDS ON THE LAC"

Here I painted the canvas with  2 different colors of black, one opaque and one metallic. I thought it looked too plain so I added the metalic threads going out from the quilt around the edge of the canvas.
 I used Madiera FS20 metallic thread for the edging and in the piece. I love using that thread. For me, it's been great in the machine and for hand work.
I signed on the back of the canvas in addition to already having signed on the back of my piece.
I still have not decided whether to hang these pieces or display them on easels.  They look great in black easels.

Ok, I'm heading out to the studio to feed that hungry muse ;-)

Karen

PS. Someone said they tried to post a comment and could not do so. If you are a member of QAK and want to post a comment, you can do so on the QAK Facebook page.  In the meantime, I'll try to figure out why comments cannot be posted.

Thursday, March 15, 2012

Mounting Art Quits on Painter's Canvas: Part 2

I finally finished my first attempt at mounting a small art quilt on Painter's canvas.

The piece, "Winter Sycamore", is about 9"x11".  I mounted it on an 11"x14" canvas. 

I painted the canvas with 4 different colors of Jaquard paint, mostly metallic. Then I glued down angelina scraps to represent the fallen leaves that surround the tree all winter.

Here are pictures that show the whole the finishing process.

 After painting the canvas, I decided to see if I could put a better finish on the edges of the art piece. The silver edge just didn't finish it right. I decided on using a variegated ribbon yarn. 


 I had to apply the ribbon yarn by hand. I could have done it by machine but I had beaded too close to the edge to use the machine.

The colors in the yarn really pick up the colors in the piece and connect all the design elements.


I sewed the piece into place using black quilting thread.  Now I'm trying to decide if I should add hanging wire to the back or just a little hook for hanging the piece. The picture was taken on a black design board.

Close-up of the thread painting stitching/quilting, over the heat bonded silk roving. Angelina fibers were needle punched into the base of the tree.


Here's a close-up of the heart of the tree. It's a blister pearl that has been captured with 2 strands of delica seed beads.  The gold seed beads represent the seed pods that hang on the tree all winter.

I think I'm going to be using this mounting process a lot in the future. It really gives a presence to the smaller pieces and makes them easier to hang or place on an easel.  In fact, I have 2 more smaller canvases painted and ready to have the postcard size pieces mounted on them.

The canvases can also be covered with fabric but I like the effects I get with paint.

I'm going to experiment more with different ways of attaching the pieces to the canvas.

Hopefully, I'll be posting something more about all of that in the next week.

In the meantime, I'm having a very difficult time actually spending much time in the studio. The warm weather is causing havoc in the garden and there have already been many hours spent outside trying to have some kind of order put back into place.  So far, I'm way behind in the game.

Remember to feed the muse,

Karen


Thursday, March 8, 2012

Mounting Art Quits on Painter's Canvas

I have a small, about 8"x11", piece that I have not been happy with the way it finished out.  I have recently learned about using artist canvases for mounting small fiber arts works.

I found a canvas that is the perfect size for my "Winter Sycamore" piece. I painted it using three different colors of Jaquard metallic and opaque paints.

i am still deciding on how to mount the piece.

Here are some pictures of "Winter Sycamore" and some ideas that I'm playing with.

 Painted canvas with "Winter Sycamore"


 "Winter Sycamore" is coming alive after being placed on the painted canvas.


 Experimenting with a variety of trims to use to attach the piece to the canvas.


I'll get the pictures of the finished piece posted in the next week. 

In the meantime "Remember to feed your inner muse with lots of creativity."

Karen

Wednesday, February 1, 2012

Marbling fabric

A week ago I took part in a marbling workshop, along with a few other members of the Lexington Fiber Arts Guild. One of our members graciously let us use her basement studio, and even some prepared fabrics for us newbies in the art.

 I was very pleased by my first feeble attempts at marbling fabric.  I am going to try it again and am wondering what it might look like on silk. 

In the meantime, I have discovered two wonderful web sites that deal with marbling.
Here they are:
http://www.marbledmusings.com/
http://marbleart.us/

Here are some pictures of the few pieces that I managed to do at the workshop. Hmmm, wonder what some stamping would do to them.  I'll let you know when I find out. For now, I'm heading out to take a walk around the farm and enjoy the balmy weather.   Never bored, Karen