Tuesday, June 30, 2015
BIRDSONG STUDIO: QUILTOGRAPHY CHALLENGE 2014-2015: Mounting pieces ...
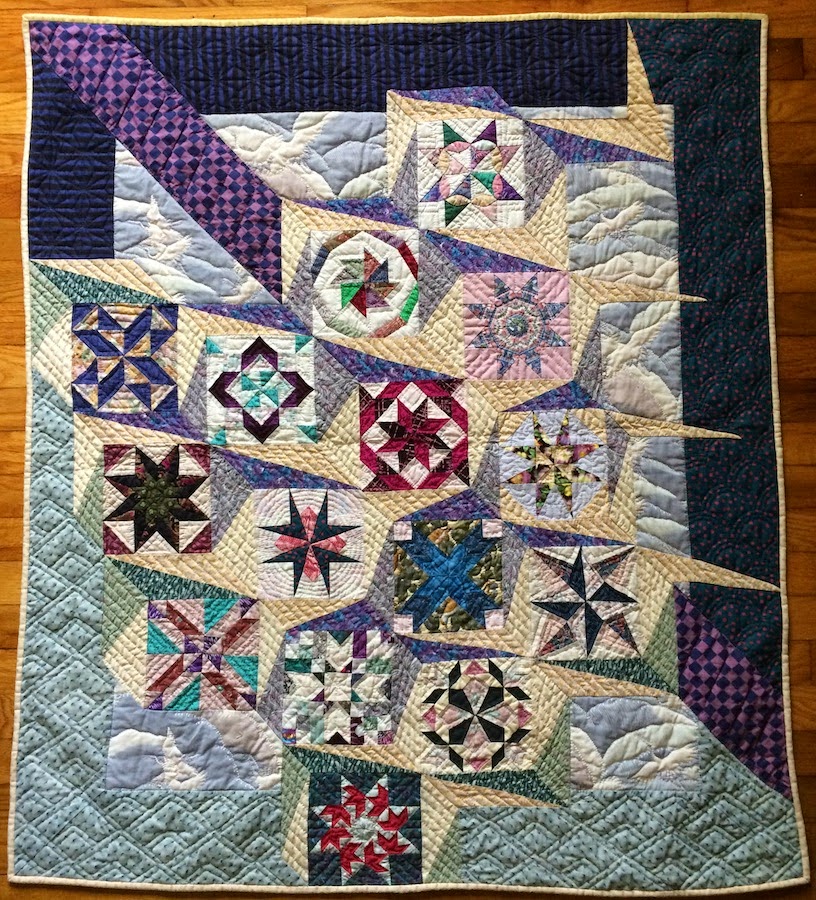
BIRDSONG STUDIO: QUILTOGRAPHY CHALLENGE 2014-2015: Mounting pieces ...: KOI POND by Karen S. Riggins, Nonesuch, KY 2014 Members of the Quilt Artists of Kentucky, an auxiliary guild of KHQS, have bee...
Monday, June 29, 2015
FUN with DYE-Na-Flo Paints and Shibori Stitching
I recently taught a half day class at the Kentucky Quilt Society "Getaway" Gathering in Cave City, KY.
The class was about using a variety of stitching and wrapping patterns, loosely based on the technique of Shibori Stitching, and painting the pieces with Dye-Na Flo paint.
Here are a few samples of the students' work.


Everyone had a great time and the results were spectacular.
I had them all pour any leftover paints into a quart jar, which I took home. It looked like a muddy
mess of a color.
Just to see what would happen, I painted a canvas tote bag with the mixed up paint and left it out to dry in the sun.


The colors separated out into a very interesting pattern. I love the new tote and have a new idea for mixing paints together before applying them to fabric.
I bought the paints from Dharma Trading. Here's the link for anyone who is interested in exploring with them.
http://www.dharmatrading.com/paints/dye-na-flow-fabric-paint.html?lnav=paints.html
Create Always,
Karen
Friday, April 17, 2015
COMING FROM THE PAST

I had a message the other day, from someone who had just gotten a copy of of the Miniature Quilts Magazine that had been published in Summer of 1991. She was very interested in making my "Kentucky Skies" miniature quilt that was featured in the magazine, but one important corner was missing from the pattern page, so, she contacted me through Facebook. I was able to photograph the pages and send them to her. I love my iPhone camera, but that's another topic.

KENTUCKY BLUE SKIES 9"x9" was designed by me in response to a challenge issued by Natalie Lahner at the KHQS Getaway in 1989.Natalie gave us each the blue fabric and we had to make a miniature quilt out of it and agree to let the quit be displayed at the QUILT BOX Shop in the fall of 1989.
This has brought up a few thoughts for me about several things.
Number 1: It was nice to be reminded about having had some of my work published and that it was and still is good work, of which I am very proud. I remember being pretty excited about having two of my handmade miniature quilts published in the same issue of the magazine. In addition, the work of one of my students was also published.
Number 2: This is the second instance of someone telling me that they had recently seen one of my quilts in a quilt related publication. The other instance involved a quilt of mine that was published in a book by Marie Salazar, 1997 called A Gallery of Quilts. The quilt was one of my first attempts at asymmetrical design. It is all hand pieced and quilted. The star blocks are 6" squares.
It's called "BIRDS of a FEATHER FLOCK TOGETHER" 1992.
I did look the book up the other day and found a used copy at Amazon. I don't know why I never received a copy of the book but I'll have one now.
Number 3: All of this reminded me that I had done some pretty creative work over the years I've spent as a quilt artist.
JOURNAL OUR WORK
Number 4: It's very important to journal our work. I was able to look up both of these quilts and get a full remembrance of the shows and publications that they have been in because I had put that information into a journal.

Several years ago, after I got a computer and digital camera, I started writing a formal journal of my work, on my computer and printing it out to go into a large binder. I used hand written notes and show notices to get information about my earlier quilts.
I now keep a catalog of photos on my computer for entering into my journal whenever I finish a new piece, at least, that's the plan. I try to do a journal entry for each quilt as I finish it but I don't always keep up. It is a lot easier to do the entry while one still remembers the fiber content of each material used, the name of the batting, the threads that were used, patterns, inspiration for the design, embellishments, the size of the quilt, etc.
A journal like this could also be very helpful to anyone who might seeking an appraisal on the quilts that are in it. Only the artist really knows what they have intended artistically and the techniques that they have used and why. When asked for an appraisal of my quilts, I have submitted very detailed journal pages with a full provenance with my quilt. Since I am the only appraiser around here, and I know better than anyone what has gone into the creation of my quilt, the pages were accepted by the show, even though technically, I cannot appraise my own work.
I also keep all show entries and other publicity about my quilts, including thank-you notes for loaning them out for exhibit. One thing that I have not thought to do is to include an up to date photo of myself with my recent work. Historically, this is an important validation of the claim that a certain person made the quilt. It's also good to keep an update biography on hand with the journal pages. It does not have to be very long.
This journal has been very important in reminding me of just what I have accomplished with this art of quilting and teaching in the last 37 years. It's a great history of my growth as an artist in this wonderful world of quiltmaking and I"m loving it. It's also a great reminder of all the wonderful , beautiful and creative quilters that I've know and do know and call friends.
I encourage each of you to start keeping a journal of your quilted art work and to print it out.
Creating Always,
Karen
Thursday, March 26, 2015
FINISHING SMALL QUILTS FOR DISPLAY

Last night I made the letter "K" block that will be used to make a sign for the "Quilts With a Kick" Show that will be in Berea, Kentucky this summer. The show is an exhibit of our current year's challenge which is "Stampeding Quilts". However this blog is not about the show, it's about finishing small pieces for display, because of the Quiltography Challenge we, the Quilt Artists of Kentucky, have going on.
The challenge is to interpret a photo into a 12" art quilt. We are going to be exhibiting these pieces at the Kentucky Heritage Quilt Society "Getaway" in June and possibly some art galleries later in the year.
The challenge we are having with small art quilts is how to display them in an attractive manner, while also keeping them light in weight and easy to hang. In a previous post I discussed attaching them to artist canvas. You can find that post in the March archives.
One of our QAK members, Betsy Terrill, told me about using a double layer of Peltex. She uses the Peltex that has adhesive on both sides. I didn't have any on hand so I used Aileen's Tacky Glue instead and heat set it with an iron.
I started with cutting out the plain front of the quilt. I applied the letter after I got the front piece of fabric glued to the interfacing.
I did not have any Peltex on hand but I did have extra heavy interfacing. According to the directions that I received from Betsy, I cut the front piece larger than the piece of 8"x10" interfacing. I applied glue to the fabric, on two opposite sides and glued them to the interfacing. I then created mitered corners on the two remaining edges, applied glue to them and folded them over into place.

I then applied the letter to the front and quilted the whole piece, using only the interfacing as the batting and backing. If you are using this method with a quilt that has been pieced or already appliqued then you must plan ahead so that there is plenty of fabric left over to wrap around the edges.

Here's what the back now looks like after being quilted.

I then created the back of the piece, using the same gluing process and quilting it all over.

Here's what the back of this piece looks like.

The two pieces are now ready to be put together to create a finished quilt.
I applied glue to the back side of the front and glued the front and back together. I then heat set the two pieces together, using an iron set on hot. Using Peltex or extra heavy interfacing with heat bonding on both sides would eliminate this step, but it's also quite a bit more expensive.

I finished off the edges using the same metallic thread that I had used for the quilting. I used a quilting foot to have more space under the foot and did free motion zig-zag stitching around the edge. This finished off the edge and it holds the two pieces together. I ended up going around three times to get in enough stitching. I do not have any hanging wire or thread attached to this piece since it will be part of a larger piece.

Betsy Terrill has finished off her 12" square piece with a hanger made of buttons and thread on the back. The back of her small quilt also echos the design on the front. She has also applied a label to the back.

Front of the quilt.

Betsy also stitches the two layers together where ever she can do so without the stitching showing.
Some other ways of working with this process would be to make the back a bit smaller than the front so that it doesn't show at all.
Make the back larger than the front and have the extra back work as a frame for the front. The front edge could be finished off in a decorative manner before applying it to the back using stitch-in -the ditch.
It also occurred to me that all embellishments, in the body of the quilt, need to be done before attaching the back.
Edges could still be embellished after the two pieces have been attached together.
This method does make for a secure piece that will hang beautifully and be light enough to mail and transport. We will have about 50 pieces for the KHQS exhibit so weight and ease of hanging are real issues.
Thanks to Betsy for sharing her ideas about finishing small pieces for display.
Ideas and comments are always welcome.
Create Always,
Karen
Monday, March 23, 2015
QUILT HARNESS
 |
| Cindy's harness in action |
Cindy Vough, one the Co-chairs for QAK, has come up with a great idea for a "quilt harness" that is an easy and inexpensive variation of the ones used by Caryl Bryer Fallert in her studio.
What is a "Quilt Harness"? It's a contraption that can act as a third and even fourth hand, depending on how many you think are needed, while you are machine quilting a piece large enough to slide off of the table or create uneven weight. It evens out the weight distribution of the quilt.
Following Cindy's directions, I headed to Lowe's to buy the needed supplies. Here are the parts that I found there:
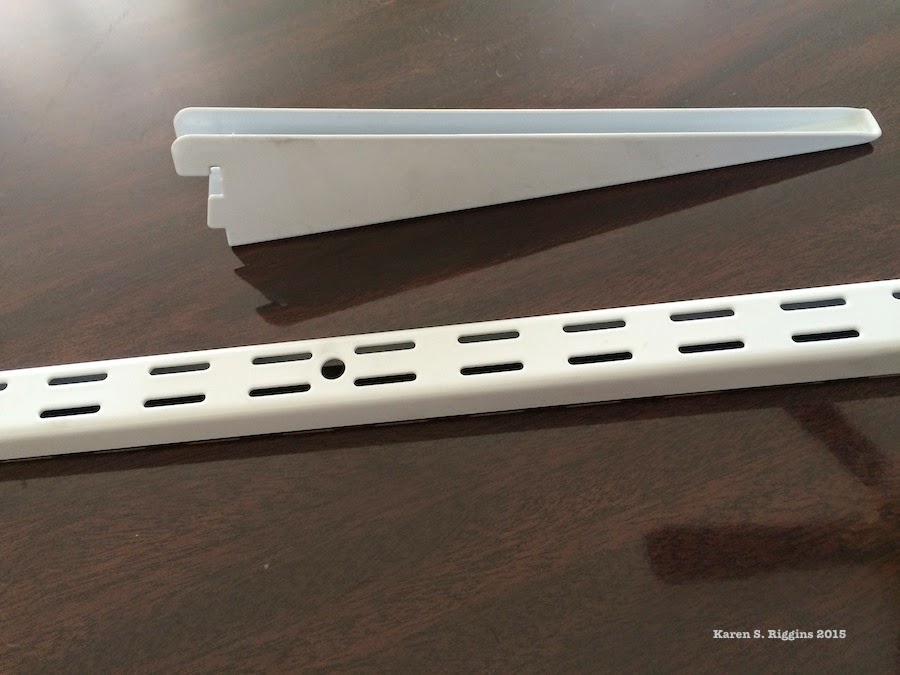 | |||
| Closet shelf bracket and support. |
The shelf support bracket is about 2' tall. The shelf support is double walled and very strong. It also has a hole in the notched end that allows for a piece of rope to be pulled through it.
 | |
| Holes in both pieces that allow for a piece of rope to be pulled through. |
A clamp-on vise is needed for holding the closet rod in an upright position.


My table has a beveled edge and the clamp was not big enough to go over that edge far enough to hold it in place, so, I used a small piece of wood, that was left over from making quilt rods, to act as a level edge for the vise. It's a very small vise and rather cute in that blue color.
Place the shelf support bracket into the vice-grip, with the open side of the bracket facing away from the table, and with the round hole at the top. Tighten the vise-grip until the support bracket is firmly in place. Place the shelf support into the bracket near to the top.

Tie some of the clothesline firmly around the vise-grip.


Attach a large clamp clip to the clothesline.

The quilt harness is now ready to use. Here is a photo of me using it when I finished the edge of my "DRAGONFLY POND" quilt.

I placed my harness next to my left arm. I can easily reach up and move the clip without having to get up. It is also in the right position to keep the quilt from dragging off of the table. It also holds the quilt above the table and takes off the weight of the quilt on the table.
I am wondering if the shelf bracket should be taller. I have wound the rope around the end of the shelf support to allow me the option of making it shorter or longer as I am working. A taller support bracket might make it even easier to hold the quilt up and off of the table.
I think a larger clip clamp would also be better. I just haven't gotten around to buying one yet.
I really like this idea of Cindy's and am grateful to her for allowing me to share it with all of you. Let us know if you give it a try and how you like it.
Create Always,
Karen
Tuesday, March 17, 2015
"DRAGONFLY POND" is finished!

My "DRAGONFLY POND" quilt is finished and hanging in the kitchen. It has been an experiment in finishing a top that was made in a workshop and that I didn't find interesting anymore. Here is a photo of the original top.

You can see that there were several changes made. In earlier posts, I have talked about the many steps that I went through with designing the new quilt. You can find them in the archives for February.
It's been fun doing this "redo" because I felt totally free to experiment, especially with paints.
At the end of my last post, I had just painted in all of the white highlights.

I didn't feel like I had enough dark contrast, so I used a dark burgundy and painted in shadows around the white. It gave me more of the feel of gently moving water.
I also added in some beading on the tendrils floating from the Water Nasturtium Leaves and in the water weed ( made with green painted, distressed cheese cloth) around the rock. The purple weedy growth was done with purple, 11o seed beads, using a fringe technique.

The rock has also been repainted to give it more depth. I used a burgundy color because I really felt like a "purple" accent was needed. The rock also now has three turtles sunning on it.
Plain glass beads were used to simulate air bubbles on the stems floating around the Water Nasturtium leaves. I also used up a supply of glass frogs, who are now enjoying the sunshine on the pond.

The edges were finished with a combination of satin stitches. The first layer was done with a ragged satin stitch using black thread. The second round was done with a regular satin stitch using a variegated tri-lobal poly thread. Both of these threads are 40 weight.

I added a third round using FS#20 metallic thread by Madiera. It is the same copper thread that I used on the fish. I used a free motion technique with the machine set on the satin sitich. It was easier than trying to get the edge to run under a presser foot.

I purposely made the edges with a ripple effect to add to the idea of water rippling in the pond. I also trimmed the piece in non-symmetrical curves. Again to add to the effect of a pond and it's wavy edges.
After this experience, I am excited about working with some other old pieces, some quilted and some not, to see what new and wonderful things I can do with them and to have the freedom of just experimenting.
I love this quote:

It looks we are in good company when experimenting with either unfinished pieces and changing them around or even cutting into quilted pieces.
So, look around your studio. I'm sure there are pieces waiting to be discovered and changed into something new and exciting.
Create Always,
Karen
Sunday, March 8, 2015
LAST BATCH OF SNOW DYED FABRIC
 |
| Pans covered with snow. Love those heavy winter gloves. |
With 11" inches of snow on the ground and plenty of fabric that could be dyed, I did one last batch of Snow Dyed Fabric last Friday. I had discovered a pair of heavily insulated gloves that someone around here had bought years ago, so I used them to pack the snow into the pans. They worked great!
Here's all the pans filled and with the snow starting to melt. I love seeing how the colors in the pans change as the snow melts.

I cut the fabric into one yard and fat half yard pieces. I did one piece that is 2 1/2 yds long. I scrunched it into an old wallpaper pan. I'm going to make a long tunic top or a short dress with the long piece of yardage. When someone asks me if I Tie dyed it, it will be fun to see their reaction when I tell them I Snow Dyed it.
This time I used a silk/soy fabric that has a shiny side and a dull side. The dull side shows the dyes up much better than the shiny side, so, that is what I"ll be using in my work.
Here are photos of nine of the pieces. I've finally figured out how to write dates on the photos along with a number to keep my fabrics cataloged, for my personal journal.


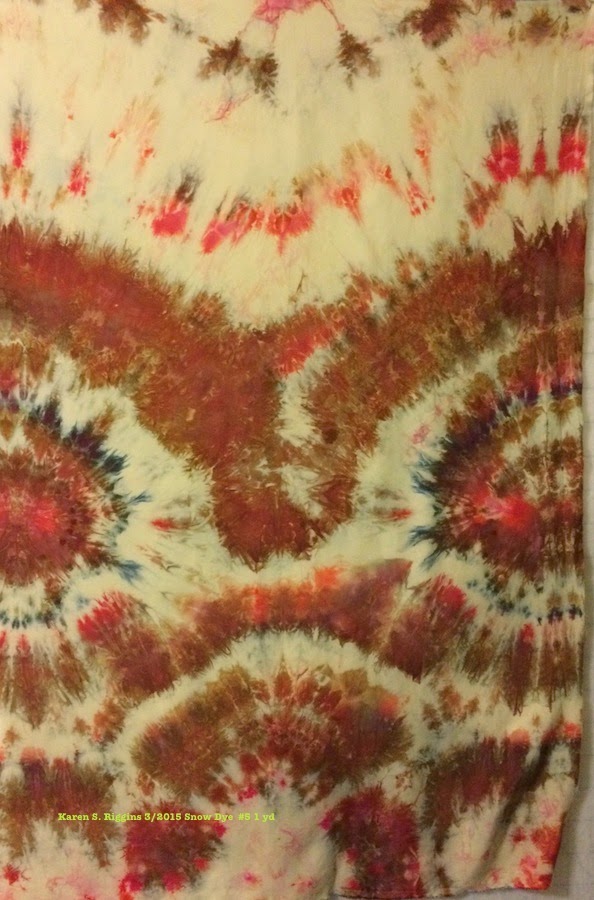


I have about twice this many pieces but these give a good idea of the variety that I achieved. I'm still not real happy with the effects that I'm getting with the red dyes, but, I'm loving the rest of the pieces.
I'm seeing "whole cloth quilt" written all over most of these pieces. Interesting quilting designs combined with surface beading!
Let the fun begin!!!
Creating Always,
Karen
Subscribe to:
Posts (Atom)