Sunday, March 1, 2015

SNOW DYEING 2015


Last week, with over 15" of snow on the ground, I thought that it was a good time to experiment with some snow dyeing.  It's always an experiment because I never know for sure how the snow that I happen to have that day, will work with the fabrics on hand.

I do the dyeing in our farm shop which is heated at about 50 degrees, so, it takes about 24 hours for the snow to melt, depending on how wet the snow is. This snow was pretty dry and about 6 hours after I got everything into the pans, I ended up spraying them with water to get the snow to melt and produce more liquid. They dyes weren't getting to the bottom of the pan.
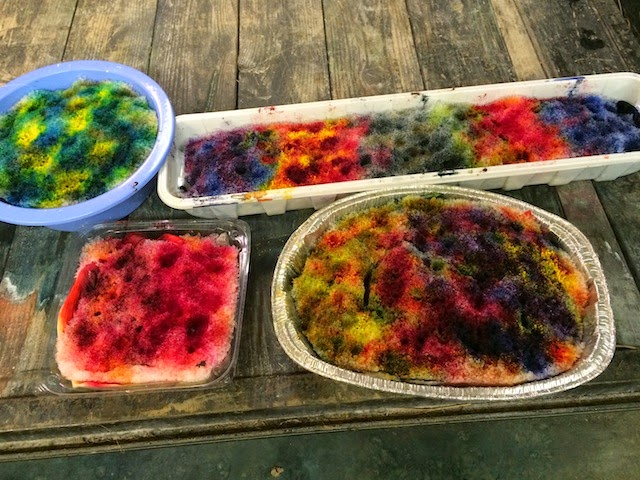
Snow starting to melt on first group of fabrics


The first batch that I dyed had some wonderful pieces and some not so wonderful pieces in about equal proportion.  I used base fabrics of cotton sateen, a silk/cotton blend, a silk/linen blend, and two 45" by 54"  pieces of silk velvet.

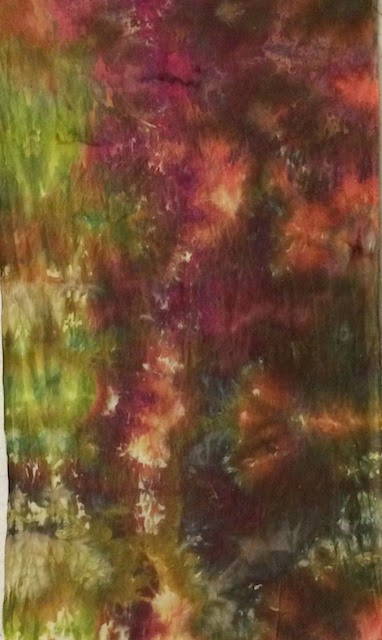
The velvet pieces are in the long wall paper pan.  Since I used the same colors on both pieces of fabric, they turned out pretty much the same.  Here's the piece that I like the best:

Silk velvet


The blue and green dyes really saturated the fabric. I was very surprised when I saw how dark they turned out. I did get a crystalline effect on the middle portion of the fabric. The other piece turned out even more saturated with color.

Here are some of the pieces that really showed a crystalline effect.


Some of the red pieces tended to take the dye almost in a solid fashion as did some of the blue pieces. 

TWO DAYS Later:

The snow is melting in places and icing over again at night. It's great snow man snow once you break through the icy crust.

I ripped up 10 yards of fabric using silk/linen and silk/cotton blend fabrics as the base fabrics.
The pieces were about 36" by 22".  I noticed that I got the best results, in the first batch, on the smaller pieces. 

This time, I put each piece in it's own pan. The pans are a collection, from years past, of  taking home left-overs from local Mexican Restaurants. I folded and manipulated the fabric pieces and then placed them in the pans. The dyes were set out according to color, each with it's own marked spoon.

Fabrics in pans ready to add snow. One of the pans is already packed with snow.
The snow was the kind that packed really well. I used 1 1/2 five gallon buckets of snow. I patted it down on each pan until it was almost solid. Then I added the powered dye colors. NOTE: Be sure to wear a mask when working with the dyes.

Pans filled with snow and dye powders sprinkled on top. 


Each of the pans has holes in the bottom, so, as the snow melts, the excess liquid drains out of the pans. I can do this because I have the pans on my husband's farm trailer, in the shop. The concrete floor in the shop has a wonderful array of colors on it.

Snow melted and fabrics are ready to wash out.

The fabrics are a lot easier to rinse out since a lot of the excess dye and liquid are on the shop floor instead of in the fabrics.  I hand rinse them in the big wash tub sink that is in the shop bathroom.  I collect all of the rinsed pieces in a five gallon bucket. I then carry the bucket into the house and load all of the fabrics into the washer, add about 1 tsp of Synthrapol and wash everything on hot. 

After drying all the fabrics, I iron each piece, because that's the best way to see all the patterns that were created by the melting snow and dye.

Ready to iron. It's handy to have a good audible book to listen to.
FINISHED FABRICS: I love them all!


 Some of these pieces will be quilted as whole cloth quilts and most likely have surface beading added to them.

If you don't have any snow, these results can be obtained with using ice.  I used the snow because it was here and it was free. Out of two different dye batches, I've ended up with about 20 yards of dyed fabric. To dye that much fabric using ice would be time consuming if you are freezing your own ice or expensive if you buy the ice.

I think I have enough fabric to keep me busy for awhile.

Creating Always,

Karen


Tuesday, February 24, 2015

A CABOCHON is CAGED


I got the first of five, Mother of Pearl cabochons caged last night.  I may have to do the rest of them in the daylight.  I used rainbow orange  #10 seed beads for the caging.  These are really going to add a lot to the quilt.

I also requilted the fish fins using a purple FS#20 metallic thread and added white highlights to the fins. I love the effect! It really looks great in person, so to speak.

It's amazing what adding in some white paint can do for a piece.  After dab painting the whole background  with a metallic dark green paint from Stewart Gill, I went back and added in the white highlights using Jaquard White metallic paint.  I ended up adding in the highlights while the piece was hanging on the design board. It was the only way I could get an accurate view of the effect of the white paint. 


One thing I discovered was the fact that I was not using enough paint. I was applying it too lightly and it just won't show up that way.  So, I had to get really bold with the white paint. 

This is turning out to be a very fun way to experiment with doing more painting on a quilt. Now it's time to finish the edge and add in some more beading. 

I am very excited about finishing this piece and am planning on hanging it in my newly remodeled bathroom. It's going to be perfect with the Coral Silk paint that was used on the walls.

CREATING with JOY,

Karen

SNOW DYED FABRIC


Here in Nonesuch, KY we received over 15 inches of snow last week. On Friday, there were forecasts of rain and temperatures high enough to melt the snow, so, I decided to do some Snow Dyeing before the snow was all gone.

I don't know what I was thinking since there was way too much snow to melt very quickly and the temperatures were going way down. There's plenty of snow left to do more experiments with Snow Dyeing.

It really is an experiment. This one had some fantastic results and some really good results.

 Here are some of the fantastic results. These are about 36" x 18" pieces of cotton sateen.

Cotton Sateen

Cotton Sateen

 
Cotton Sateen


I love these pieces so much, that I'm going to quilt them as whole cloth quilts. It will be my first time doing something like that and I'm looking forward to seeing what happens. Especially, when I start adding beads.

Here are some examples of a Silk/Linen Blend. These are about 30" by 45".

Silk/Linen Blend

Silk/Linen Blend
The Silk/Linen blend takes the differently on each side of the fabric. The shiny shiny silk side is shown here. It looks very vibrant in the shiny side. The duller linen side has muted look that is very organic in look.

It is interesting to use various fibers, as they each take the dye in a unique way.  I can never tell how they are going to turn out.

I dyed two larger pieces of Silk Velvet. They were about 54" X 50" in size. My conclusion here is that smaller pieces work better with the snow dyeing. The velvet took the color really well but the blues and greens turned out too dark and too solid in color. That said, I love this piece and also plan to quilt it as a whole cloth quilt.


These are not all of the pieces that I dyed. They are the ones that I like the best.

I did some on a silk/cotton blend using red dyes. There is a lot of white space on that piece. It will be cut up and used in projects.

I've come to the conclusion that the best snow to use is the heavy wet kind. This snow was really fine and dry. Just one five gallon bucket was more than enough snow. I could not get it to pack down on top of the fabric. When I checked on it a few hours after getting it all ready to go, the snow was not producing enough liquid to cover all of the fabric.  I sprayed it all with water and gently poked the dye further down into the fabric. It might be a good idea to spray dry snow before adding the dye powders.

This was a fun experiment and I'm really pleased with my newly dyed fabrics. I'm hoping to get some more done.

CREATING WITH JOY,

Karen


Friday, February 20, 2015

DRAGONFLY POND: The redo continues

The Dragon Fly Pond Redo has been an ongoing project for the last three weeks. In my last blog about it, I had just added fins to the fish and started painting shading onto the leaves.

Here's the photo:


Since then,  I used  a white iridescent Shiva Stick Oil Paint, to add in highlights on the water and the rock. I also finished painting all of the leaves.  I used a variety of acrylic flat and pearl paints on the leaves.

 I quilted the fish using a metallic thread by Madiera called "FS20" Metallic in Copper. It is a 20 weight thread.


The rock still looks to flat to me and the fish fins seem to be disappearing. So, last night, I painted the fins with a mixture of Stewart Gill cream and white pearlescent paint and gold Tsukineko Ink. I used the same combination of paint and ink to highlight the fish heads. I also added yellow crystal beads to the eyes.  I keep thinking I need purple somewhere on the fish. Maybe requilt the fins using a purple metallic?


I also trimmed the excess background away from the quilt. I cut out a curvy edge that will be finished, I think, with a wavy, satin stitch edge.  

The rock was repainted using a more opaque white paint on the top and black Tsukineko Ink around the edges.  I then glazed the whole rock with a beige metallic Tsukineko Ink. 

It is now also surrounded by weedy growth made out of painted and distressed cheese cloth.

 
While looking through my bead supplies for fish beads (Hard to imagine but I don't have any) I spilled a whole box of shell beads. Amazingly, none of them broke on the clay tile floor, but they did go hither and yon.   

While I was picking them up, it occurred to me that the Mother of Pearl cabochons, that were scattered all over the floor, might look good on the quilt. I laid a few of them out to see and I like the look of them. The issue here is, they are cabochons and they will have to glued then caged with beading into place. This was going to be a quick project.  Oh well.  

Coming soon: Turtles on the rock, air bubbles in the weedy growth around the rock, and caged cabochons.

Off to do some snow dyeing before the snow is all melted and, or refrozen into ice, by the rain that is expected this weekend.

Loving all this time to create.

CREATING ALWAYS with JOY,

Karen

PS: I used the new Steam a Seam Light on the fish fins.  I found that it really gummed up my sewing machine need. I'm going to be experimenting with Soft Fuse as soon as I can order some. I'm also going to keep using Misty Fuse.


ANOTHER REDO: CRESTED IRIS

I have had a hand appliqued Crested Iris hanging on my design board forever because I could not figure out how to finish it.
It was an early attempt at creating my own applique designs inspired by wildflowers. I hand appliqued the flower and leaves. I then enhanced the applique with hand embroider and beading. There is some beading on the background in this photo, which I removed for this redo.  I has also lightly machine quilted the background and applique design.


The border was created using Solvy and layers of thread and yarn that were heavily stitched to form a collage fabric. It was pretty but very floppy. When I decided that I wanted to mount this piece on a painter's canvas, I realized that I would have to do something about the border.

I decided to paint it and see if that would stiffen it. It did. It also got me to thinking about adding painted highlights to the rest of the piece. Unfortunately, I did not take step by step photos.

Here is the finished piece:


 First, I added more machine quilting to the background.  Then I started painting "highlights" on the flower and  leaves. You can see that the color of the flower petals was changed by the paint. That's because, I liked the painted effects so much that I just went for it and painted the whole flower, leaves and the background.

I used Stewart Gill paints on this piece. They have a wonderful, smooth texture and come in a variety of looks.  I used Pearlize and Byzantia on this piece. 

When I was looking up the web site just now, I discovered a new paint, Stewart Gill Gallactica, which is a sparkly, water-based acrylic glitter paint. I think I must get some of this paint.

I ordered all of my paints from the "artisticellar" web site.  Right now they are out of all of the Stewart Gill paints except for the Galactica.  They do have some other luscious looking paints called "Silks Paints" that I am also going to check out. Here is the web site, just in case you want to check it out:  http://www.artistcellar.com/paints/galactica.html

Can one have too many paints in the studio? I'm finding out that I cannot, especially when they come in little jars and I'm having so much fun with them.

This piece has not been mounted on a canvas yet. When it is, I'll use a 1/2" painter's canvas and paint just the part of it that will show.  I'll have details in a future post.

CREATING ALWAYS, WITH JOY,

Karen


Saturday, February 14, 2015

DRANGON FLY POND: REDO UPDATE


All of the leaves have been glued down ready to iron into place.

Hello 

Well I've gotten a lot more done since the last posting about the Dragon Fly Pond redo of an old project.  The above photo shows all of the Water Nasturtium leaves put into place on the quilt top and ready to be ironed down. I used glue stick to hold them on long enough to get the iron on each one of them. The fish all have fins now and there is one additional fish.

Here are the leaves just after they have finished drying on my paint table. I spritzed the leaves with water and then, I applied the Dyna-Flo paints.  I poured each color into a small plate, rather than working from the jars. The leaves looked a lot darker than this when they were first painted.

Painted and dry leaves 


After getting all the leaves fused onto the quilt, I quilted them into place.  I then starting adding in  painted shading.  I used acrylic paints mixed with Golden Fabric Medium that I bought at Michael's  Arts and Crafts Store in Lexington.  The quilting doesn't show up real good in this photo. It's just a center circle with lines coming from the circle. The edges were free motion stitched in wavy lines that were repeated around the edge a few times. I used a variegated tri-lobal thread from Superior Threads.

Leaves quilted onto the top and in the process of being shaded in with paint.


 I made the fins out of a shiny organza layered with silk interfacing. I used the new "Steam a Seam Two" between each of the layers. That has proven to be problem with stitching through it with metallic thread. I have gold metallic that I purchased from Superior Threads many years ago that always works great for me.  I couldn't get it to work for more than a few stitches when trying to quilt through all of the layers that were either fused or painted or both. If I do this kind of layering again, I'll use "Misty Fuse".

I finally gave up on it and went with a FS #20 metallic from Madeira Threads (http://www.madeiramart.com/thread) . It's darker than what I first wanted but I am loving the way it sews and the look of it on the fish. I"m using a bright copper color.

Fish with quilted scales and fins. The left fin still has the gold metallic thread.

 I still need to quilt in some detail on the head of the fish. I'm going to use a white polyester thread for the head.  I'll also be adding in more detail around the leaves and, of course, the rock needs attention.

A word about some of the supplies that I'm using. The Dyna-Flo paints can be purchased from:
http://www.dharmatrading.com/

The threads can be purchased at: 
 http://www.superiorthreads.com
I use a lot of their polyester threads.  

Q-First in Quilting, located in Lexington, KY does carry some Superior Threads. 

The Evolon can be purchased at:
http://www.meinketoy.com/item_680/Evolon-Soft.htm  
Warning! This is a very fun site to visit.     

I love using Evolon for certain things.  It never has raggedy edges because it is a non-woven man made fiber. It is soft and velvety and easy to cut and quilt. It's expensive but it's worth it when nothing else will do quite the same thing.

 If you want to keep up with what is happening in Birdsong Studio and beyond in the quilt world, just fill in the "follow by email" button with your email address.

Joyfully Creating in Nonesuch, 

Karen 


Thursday, February 12, 2015

QUILT ARTISTS of KENTUCKY BEREA RETREAT

The Quilt Artists of Kentucky are having a retreat in Berea, KY this year as part of the "Quilts with a Kick" Show that we have every year.
Here is the flyer for the event and the registration form:


If you are not a member of QAK, you can become one by going to the KHQS web site and downloading a membership form.  It's only $20.00 to join KHQS and another $5.00 to join QAK. This is a great group of exciting artists who love to share with other art quilters.
The link to the website is in the sidebar. While you are there check out the brochure for this year's Getaway.  It is promising to be a really good time with lots of class offerings and other events going on.

Joyfully Creating in Nonesuch,
Karen