Wednesday, February 11, 2015

DRAGONFLY POND: Updoing an Old Project

Top made in a Getaway Class 2004-5

 I started this top in a workshop that I took at the Kentucky Heritage Quilt Society Getaway. Unfortunately, I cannot remember the exact date of the workshop, but I think it was around 2004-05.
It was a workshop on machine piecing diamonds in strips and working with multiple prints.  Well, I got home, and not being real excited about the results, which you can see in the top photo, I stuck the top away.

The past two years or so, I've been getting out unfinished and old projects and either redoing some of them or finishing them in unexpected ways.  It's a great way to experiment with products and techniques. That's what this piece is all about now.

This top now has a large dragonfly on it. It will depend on the viewer as to whether or not they see a dragonfly's shadow or a black dragonfly. I also added four fish. They are cut out of a piece of silk/linen fabric that I mono-printed with acrylic paints.

With dragonfly and fish fused on

I then quilted the whole piece in order to stabilize it, before adding fins to the fish, and quilting the Dragonfly. I used a squiggly square design that I found in a book of Japanese stencils. It was an easy design to work with since I did not have to mark anything. The quilting is pretty dense as I wanted it to look like the ripples in water. I used the same color variegated, tri-lobal, polyester thread for all of the quilting.

Quilted with a squiggly square design


After quilting the whole top, and sewing the Dragonfly and fish into place, I painted the whole thing in swirls, using Dyna-Flo paints that had been diluted with Golden Fabric medium. The paints dried darker than I had thought they would, but I got the movement that I wanted.

Painted with Dyna-Flo paints 


After that, I mixed up equal amounts of Seta Color Transparent white and white glitter paint with some Golden Fabric Medium.  I then used a sponge to speckle paint the whole top. I was trying to get the look of the sun glinting off of the water. This photo only shows half of the top speckle painted. You can see the additional movement that it is giving to the design.

Speckle painted with white
I have now decided to call this piece "Dragonfly Pond" but it is looking too empty of life for me. It needs rocks and water plants and more fish. Yes?

So, last night, I cut out and painted some Water Nasturtium leaves. The leaves are cut out of Evolon, that has been backed with Misty Fuse.  I painted them using Dyna-Flo yellow, green and blue paints. I love the way these paints flow together and are not at all heavy on the fabric. I also added one more fish and a few fins to the fish. I"m using the new Steam a Seam for the fins.

It's looking a little more lively now.

Leaves, a rock and more fish
I am going to add more leaves and the rock will have at least a frog bead on it. That's all for now though.  I'm very curious about how this is going to turn out. The one thing I'm sure of is that I am really going to like it!!

Joyfully Creating in Nonesuch,

Karen
ksrquilter@gmail.com

I love blog followers. You can easilHeartful Cooking in My Nonesuch Kitcheny follow this blog by entering your email the right hand column.


Monday, February 18, 2013

CREATIVITY - I Want Some of That!

  I love this quote from Meister Eckhart:  " And suddenly you know, it's time to start something new and trust in the magic of beginnings..."

We all have to trust in the magic of beginnings and I am often asked where I get my ideas for beginning or creating a new Art Quilt.  I've been giving this question a lot of thought because those who ask it of me seem to think they are not as creative or cannot come up with really good ideas for their own work. 

First of all, it seems to me that Creativity is not a static thing that one person has and another doesn't. We are all creative in various aspects of our everyday lives.  We decorate our homes, pick out outfits to wear, cook meals, garden, speak languages, love our pets, etc. Being creative is an act of living.

OK, so how does this translate into creating works of art and, for us art quilters,  Art Quilts?  
  
EMBRACE OUR VULNERABILITY

First of all, we have to love ourselves and trust ourselves enough to open up and fully embrace our vulnerability.  For years, I've had to tell myself to "just do it" and not let fear of failure or someone else's opinion keep me from creating a new piece.  A lot of Art Quilters, and I suppose artists in general, seem to have a fear of not being as good as someone else or "ruining" a piece of fabric, of wasting time and resources, and, they end up letting that fear stop them from starting a project.  If we choose to  embrace our vulnerability, then we have opened up the pathway to love and, therefore, art. 


When we open the pathway to love and art we begin to trust and love ourselves for the wonderful creative beings that we are. We then find that ideas for creating a beautiful work of art can come from all sources and we'll be open to them. For me, it's often from taking a walk through the woods or being in the garden. I take lots of photos and store them in a "DESIGN" album in my iPhoto.  Then I can browse those photos and get ideas for a new project.

The piece on the right was inspired by rugged tree trunks that have lots of lichen growing on them and vines hanging off of them.

Sometimes ideas come from learning a new technique or remembering an old technique and using it in a new way, or by combining old and new techniques. Maybe from getting out an old project and changing it by incorporating new techniques into it. 
 
 Keep a journal of doodles, draw simple line pictures inspired by a quote or dream,write down what you are thinking about each picture or photo, look at art of all kinds, take classes and attend lectures, join an Art Quilt Group or found one, and, remember to breathe.  I've seen more than one student trying to make something work and they really weren't breathing. (Whoops, I just described my-self doing Free Motion machine quilting. It's amazing how conscious breathing can help you relax and create.) 

Always enjoy working in the present, savoring each step of the design and construction process.

Love what you are doing and practice gratitude and joy for it and you will find that the ideas are unending and the work will be easy. 

Here's a link to a wonderful TED Talk by Brene' Brown on Creativity.http://www.onbeing.org/blog/bren%C3%A9-brown-leaning-our-vulnerability-video/4903
She gives a very inspiring, 15 minute talk.

Finally, 

Love Your Work and Rejoice in your Creativity,

Karen  


Thursday, January 24, 2013

NOW APPEARING - A FINISHED UFP! OH YEA !


 NOW APPEARING -  WILDFLOWER WAKE ROBIN TRILLIUM
ANOTHER FINISHED UFP!


I designed this hand applique pattern several years ago. The flower was originally hand appliqued and embellished with embroidery, on a ( what was I thinking) a very boring, beige  background. 
I added on some borders and, that was the end of the story, or so I thought at the time.
Here is the recently finished piece.


 Here is the project as  I was starting to make changes to it. 

It occurred to me, that, trilliums come up in the woods through layers of old leaves and sticks and under bare trees, so, trees and sticks were added. 


 The trees are cut from brown dupioni silk that was backed with misty fuse. I just free-hand cut them out using a mini-rotary blade cutter and fused them into place on the background.

The old leaves and sticks were also cut out of a variety of  fabrics that had Misty Fuse on the back of them. I could cut little pieces, again using the mini-rotary blade knife and layer them into place , until I had the right depth and balance. Then I fused everything down.


 I free motion quilted the tree trunks with wavy, "barky" lines and the background the same way. The inner border was quilted with leafy vines. I filled in the leaves with a green Pitt Artist Pen. The pen ink is translucent, so, it just gives a very light impression of foliage while highlighting the quilting.

The dark brown outer border is quilted, in black, using a free motion  rock pattern.


I then used Prismacolor pencils to shade in the background and add more depth to it. I am in the process here. The right side has been shaded in.

Using Pastel Crayons, I added highlights to the flower petals, the leaves and the tree trunks.


 This photo is a "before " shot. Notice how flat everything looks.

I quilt the background with a variegated thread but it didn't add enough umph to it.


 I had earlier, finished the inner border off with a satin stitch edge of variegated purple thread.  The color was not a good match with the flower so I went over it with black thread.

Just enough of the original color shows through to carry the petal color out from the center of the quilt.

I added amber glass beads on the trees and ground. 

A frosting of glittery ink is on the petals and the ground. 

All finished ? Not quite.


 Using white and gold iridescent Shiva Paint sticks, I added further
highlights to the flower petals and leaves and the background.
 The dark brown border was way, well....TOO DARK.

So, I went lightly over it with the gold Shiva Paint Stick.

The satin stitch is a built in decorative stitch on my machine. 


VIOLA! A BEAUTIFUL FINISHED PIECE
Size: 11.5" x 15"


 It's been fun taking these small projects and experimenting with a new techniques on them.
Be sure to watch for more postings about UFP's from the studio.

LOVE your work and revel in your CREATIVITY ! 

Until next time,

Karen

Tuesday, January 15, 2013

WHEN THE TIME IS RIGHT!

 WHEN THE TIME IS RIGHT!
Finishing UPF's (Unfinished projects)
 
I've recently been pulling out some old projects, that got stashed into a drawer and never finished.  These are pieces that I liked, at the time, but, was also bored with them and not sure where I wanted to go with them.  Since I started some of these UFP's, I have learned a lot more about being creative and using a variety of supplies, that I wouldn't have owned much less had the courage to use. 

It's fun to be able to put new skills and collected supplies into action.

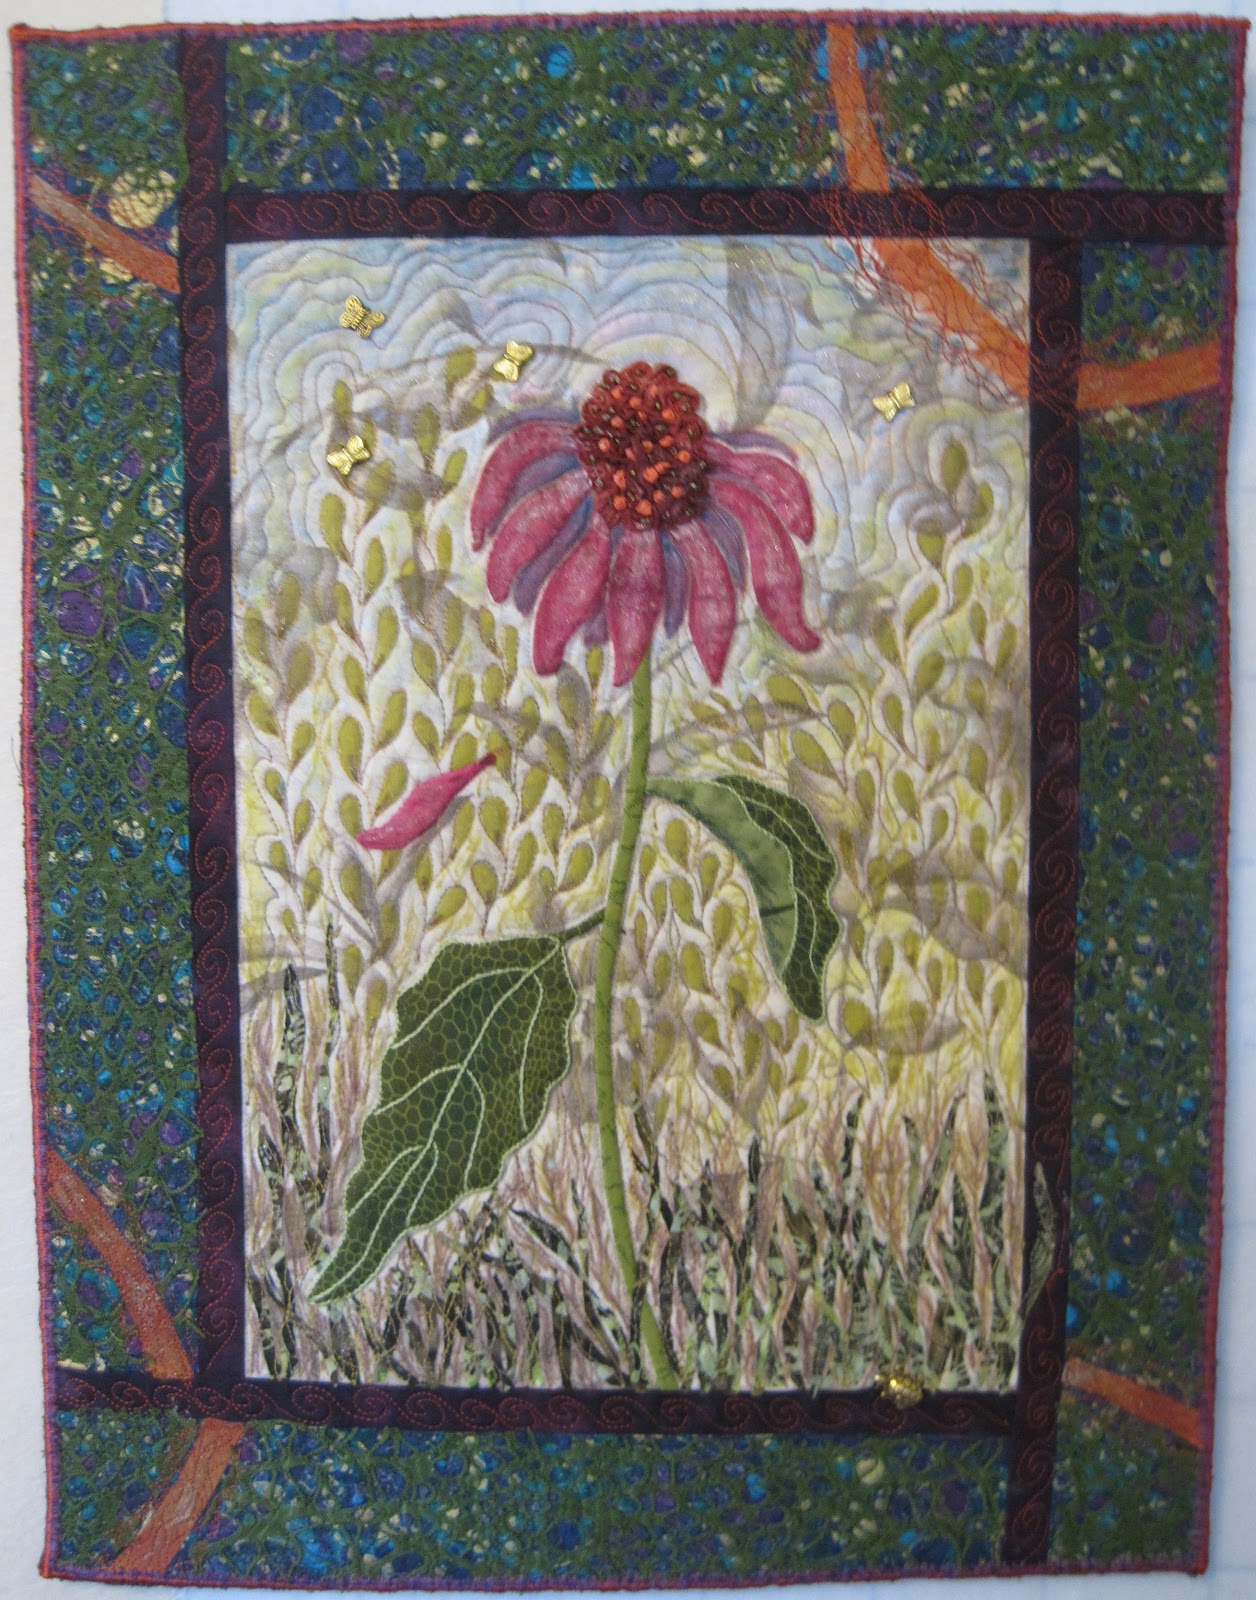
This Cone Flower piece was the first one I pulled out.
This photo shows it with some changes I'd already made, when  I thought to start taking pictures of the process of finishing it.

It was originally just the flower with the burgundy and blue border. Yuck!

Bits of grass have been added, using Misty Fuse, to give some weight to the flower.  I used a Faber-Castell artist's pen to add bits of brown seed and grass into the green fused grass.
Orange bits of hand dyed silk give some vibrancy and whimsy to the border.


 I free motion quilted a grass with seed heads design and did some echo quilting around the flower head.

The seed heads weren't showing up, so, I colored them in, again using Faber-Castell artist's pen.


I used an orange rayon thread to quilt the free motion spiral design into the narrow burgundy border. The same thread was used to quilt the orange strips in the border.

After rummaging around in my "trims draw", I came up with this green, lacy trim that I quilted onto the border.  It subdued the original blue fabric and gave texture to the border, which complimented the grass.


The width of the green trim convinced me of what I already suspected - the blue border was too wide.

I trimmed to the edge of the green lacy trim.


Using pastels, a glittery All Purpose ink and the Faber-Castell pens, I added in shading on and around the flower, the grass and in the "sky".

The edge was finished using a tri-loble polyester, thread and a free motion zig zag stitch.

Metallic butterflies and a turtle were sewn on.


 Before finishing the edge, I fused a piece of heavy duty interfacing onto the back of the quilt.  Then I caught it in with the edge stitching.  The interfacing gives enough stability to allow the quilt to be hung with a cord made out of crocheted Fire Line.

I was also able to sign the back of the quilt.  

The piece measures 11"x 17".


It has been donated to the Berea Arts Council Art Auction Fundraiser.

The opening reception is Friday, January 18th, 5:30 to 7:30 pm, the Berea Arts Council on Main St. in Berea, KY

 As you are taking classes and buying goodies at the local quilt shop or a quilt show, remember , you will use all that knowledge and those supplies, when the time is right !
                                                                                                 Enjoy,  
                                                                                                       Karen ;-)


Thursday, September 27, 2012

ANGELINA LEAVES

If you want to experiment with making angelina leaves, using real leaves, then, now is the time to do it.  The leaves are tough enough to stand up to being ironed and make good impressions in the angelina fibers.  Here's how to make the leaves.

I like to knead at least 3 colors together. It gives an added depth to the leaf.  Here I've used a light and dark blue with some silver.
**********************************************************************************

Be sure to place the leaf vein side down on the fibers. 

There should be extra fibers poking out from the edges of the leaf.  You want to make the fiber pile as even as possible in thickness.  I go for pretty fluffy all the way around but experience will teach you what is too thick and too thin.
***********************************************************************************

Slide a slightly warmer than cool iron over the parchment sandwich. Lift the top parchment piece and check to see if the fibers bonded to each other. If not, slide the iron over them again.

 Be sure to always slide the iron over the parchment sandwich. Never let it sit on top of the fibers. You will burn them.   Flip the sandwich over and repeat the ironing on the reverse side.
***********************************************************************************


Here is the leaf ironed over the fibers. Carefully pick up the leaf  and bonded fibers and check for thin places in the fibers. If there is a thin place, add a little bit of the angelina fibers to it, replace the parchment paper and iron again.
***********************************************************************************

Now, carefully trim the excess fibers from around the leaf.  The leaf will not be bonded to the fibers so you may have to pin it in place. Normally, I just hold the leaf in place while I trim around it.
Sorry for the fuzzy photo. I haven't figured out how to trim and take a picture at the same time.
***********************************************************************************

 The angelina leaf is now ready to be used as an applique on your art quilt or clothing, or made into a curly leaf using Tyvek ( more on that when I get someone to take photos of the process).

Silk leaves and leaf patterns made out of freezer paper can also be used if you do not have a ready supply of natural leaves or there is 2 feet of snow on the ground ;-)

Of course, you can make all kinds of patterns using freezer paper - fish, dragonflys, butterflies, flower petals - just let your imagination go.

One more thing to remember. Save the pieces of bonded fibers that were trimmed away from around the leaf. They can be teased apart and used again or cut into pieces and bonded to other angelina scraps.
***********************************************************************************

 SUMMER"S GLORY 2008
 For more information on using these wonderful fibers and to purchase them, go to:
http://www.embellishmentvillage.com/store.php?cat=3


Thursday, July 5, 2012

LEMONADE SHIBORI RESULTS

Here are the results of my first experiments with Shibori Painting using Dyna-flo paints and cotton and silk fabrics. Letting the fabrics dry out in the hot sun worked like a charm, even on the very heavily folded silk scarf.


  I love this first scarf. 
Of course, it took the most time and I think it shows.
I stitched meandering folds into both ends . Then, working toward the center, I tied in marbles using rubber bands. the final center was pleated and stitched closed.
The fabric is silk chiffon. I am going to try this on heavier silk and see what happens.

 This scarf was pleated, folded and rubberbanded. Apparently, I did too much folding. The fabric was too thick for the paint to penetrate all the way through. I still really like it and will probably do some further embellishing on the plainer areas.
 This is a 12" square of cotton. I just tied lots of marbles into it. I used 2 differnt colors of paint. One on top of the marbles and one brushed into the folds.
It's amazing how the colors changed.
 Another 12" square that I pleated, folded and added rubberbands. There's a lot of subtle shading going on with this one.  At first, it looks really linear but there's more to it.
 I love this one. I'm going to try to repeat this but have it more even.
 Again this piece was folded and then I used rubberbands to create sections that were individually dipped into the paint.
 I hand stitched folds into this one. I surprised by how subtle the design turned out. I'm trying this technique on another piece but making the lines more random.
Here are the above pieces, drying in the sun. Don't look kind of cute?


Last but not least, this is the cloth that I used to clean up the table after dyeing each piece.  I am really loving these Dyna-flo paints.


There's more to come. I have another tray of little pieces and another scarf drying right now.

Check back soon,

Oh, Be still my beating heart, the sky just clouded over! If it actually rains, you'll hear the screams of joy all over.

Karen

One last thing, there is a comment section, so, please, if you have anything to say, please leave a comment ;-)

Wednesday, July 4, 2012

MAKING LEMONADE SHIBORI

I've heard some say " When life gives you lemons, make lemonade". Well, of course, that will only work if life also  gives you the sugar.

Right now, life is giving me lemons in the form of this dreadful hot and dry weather. Since I have the sugar ( lots of fabric, studio space and paint), and, the shibori pieces need to dry completely before being unwrapped,  I've decided to take advantage of the hot, dry weather and experiment with some shibori painting and see how quickly I can get it to dry.

I used some cotton squares and silk chiffon for the experiment.

Here are some photos of the cotton and silk pieces with sewn areas, captured marbles and tied with rubber bands.


I don't know if these are conventional folds or not. I just figured it wouldn't hurt try several different ways and see what happens.

The Dyna-flo paints were mixed with water at a 50/50 ratio.  I then dipped some of the pieces into the paint. On some of the other pieces, I used a large brush to cover all the areas.  All of the pieces were dipped or brushed with at least 2 colors. Some of them more. 

Here's is the marble piece just after I've painted the marbles with the sulphur green. I did use a brush on this one since it would be too awkward to dip it. I then added the umber to the base fabric.


Here they are drying out in the sun, after having sat all night in the studio.


 Notice how the colors are changing as they dry.

This looks to me like it is going to be so much fun and I can hardly wait to see what they are going to look when they are unfolded and pressed.  I think the chiffon will be a fun summer scarf and I can hardly wait to use the other pieces in a quilt.

Check back here for pictures of the finished fabrics.

Surviving the heat so far and building up muscle hauling water,

Karen