Monday, July 25, 2016

JOY from Watercolor Pencils and Fabric Paint

I recently finished a quilt that was started as a snow-dyed piece of fabric. I transformed it with quilting, watercolor pencils and fabric paint into a piece that I call "JOY". 

Here is what the center fabric looked like when I started.  It is a piece of cotton/silk blend that I snow-dyed two years ago during some big storms that left many feet of snow on the ground.  There is a shiny side and a dull side to this fabric. I chose to use the dull side.


The border is also snow-dyed. The fabric is cotton sateen.

I quilted the center and then started enhancing it with Watercolor Pencils. I used Inktense Watercolor Pencils, and Prismacolor Color Pencils. 


It's obvious here where the watercolor painting has taken place. The colors are held in place with Golden, Gac900 Fabric medium.


The whole center is painted and looking a bit dark and flat.  I am also auditioning a butterfly here that is not working for me.


 I've added in some painted highlights and also used some glittery ink. Crystal Beads are also adding in some sparkle, in the center, of what has become a Sunflower.
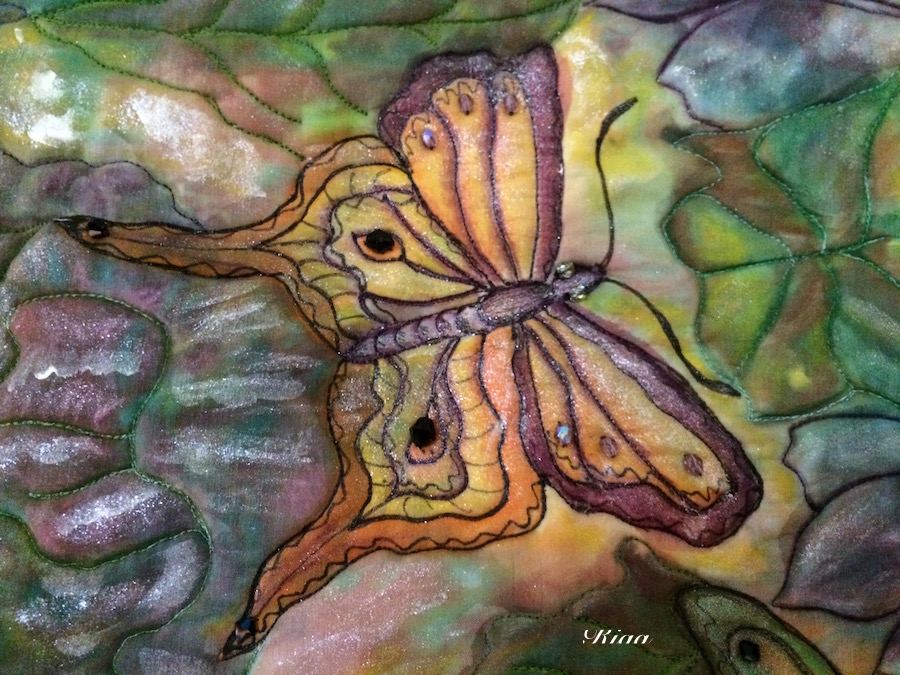


Details have been applied to the quilted butterflies. I inked in some more lines and added highlights with metallic paint. There are also some glass beads acting as eyes.

VOILA! Here is the finished quilt.  I added the word JOY and moved the angelina butterfly to a better place.  The border was  quilted with gold thread but not painted in any way. 


After finishing the edges with a gold thread satin stitch binding, I added on the lower beaded trim using glass pearls,  crystals and crackle glass beads.  This quilt measures about 32"wide by 31" long.

In addition to a label on the back of the quilt, I signed the front of the quilt with my studio mark and the date. 


This quilt is on display at the Berea Arts Council in Berea, KY as part of the "QUILTS WITH A KICK SHOW".  Our theme this year is "EMOTIONS".  

The show will be open until August 6th.  It will be part of the Quilt Extravaganza that will start on Friday, July 29 and end on Saturday, July 30.

I am now scheduling private and or small classes in the techniques that I have described here. All classes will be taught at my studio in Nonesuch, KY.

Creating with JOY,

Karen 


Thursday, May 26, 2016

DEW DROPS: Translating a Photo into a 12" Square Quilt


This piece was inspired by a photo of a branch with dew drops.  The Quilt Artists of Kentucky issued the photo as part of our year long Quiltography Challenge.

Here is the photo that I had to translate into a 12" square and in fabric.


I started with the audition of some of my hand dyed fabric.  


I then decided to stencil the background fabric to give it more texture.  I used Stewart Gill Metallic  paint.


Next I painted some lightweight interfacing. I was going with the idea that it would be translucent. It wasn't but it does make a nice lightweight piece of fabric. I laid it over some bubble wrap and then painted it with some Stewart Gill Metallic paints. I auditioned some plastic inserts from a make-up jar as bases for beaded dew drops. 

The bottom dew drop is painted interfacing that has been stuffed with green scraps.


Here I've quilted the flower and shadow. The branch has been enhanced using Derwent Watercolor pencils. I colored in the shading after doing the quilting. The large flower has also been enhanced with the pencils.  I used a metallic silver thread to quilt the flower.


I used one of the plastic inserts as a base for the beaded flowers and leaves. The insert had 3 holes in it so I could sew it into place. It gave me a 3 dimensional base on which to do the beading. I used size 11 glass beads.  There are also crystal beads edging the large "dew drop". 


Last of all, I used the watercolor pencils to add more shading and highlights to the background. I followed the quilting lines.
 Compare this photo to the one above that just shows the quilting and you can see the difference the pencils made.  I also added crystal beads to the top of the stem.


I finished the edge with a binding made from the same fabric as the stem. It is enhanced with yarn and free motion zig zag stitching done with Madiera FS20 Metallic thread.

This was a challenge to interpret and I loved doing it. It's really fun using a variety of techniques that we don't normally associate with quilting.  Of course, that's what I love about art quilting.

Here is the next photo that I'll be working with: I'm already playing with the idea of using real rocks in the piece.


Look what happens when the photo is turned on it's side.


Interesting Isn't it? 

I'll be getting started on this one as soon as I return from a wonderful trip to Ponchatula, LA.

Creating Always,

Karen


Monday, May 9, 2016

WATERCOLOR PENCILS: Translating a photo in fabric


While taking a walk down our wooded lane, I spotted a bit of blue and realized that it was a broken Robin's egg perched on top of some dried leaves.  

I especially loved the light on the egg and leaves, so, I whipped out my phone and took a photo. 

It didn't take me long to get it printed, at 8" square,  onto a piece of 100% cotton fabric.  I printed it off at 50% of it's original density. I used my home printer, knowing that I was going to paint over the photo with watercolor pencils, so, I was not concerned about the ink in my printer being lightfast.

After applying a lightweight, iron on interfacing, I then proceeded to layer the printed cotton with a light weight batting. I used a piece of upholstery fabric, that was pretty stiff, for the backing.

I then quilted sections of the photo. After quilting parts of it, I started painting with the watercolor pencils.

Here's a photo that shows the log, leaf, egg and another leaf in progress. As I worked with each color, I smoothed and sealed with the fabric medium, Golden GAC 900.


Since the photo was so pale, I decided to draw in some lines that I could then follow while free motion quilting them.


I experimented with painting quilted areas and painting non-quilted areas that were then quilted. I like quilting the area first. There is less chance that the paint will flow out of the lines after being covered with the medium. It also gives a better idea of the area being worked.  

This photo shows the piece coming close to being finished. I ended up using some glitter mixed with medium and a bit of white paint to provide more highlights. You can see a bit of the glitter in this photo. 


I finished the edges with  several rounds of satin stitch using Madiera FS20 Bronze metallic thread.


I then mounted the piece on a 12" canvas that I had painted.

Here is the finished piece.


I made some changes to the shading after finishing the edges.  I also realized that the photo could have been printed a few shades darker and would have been easier to work with.   
This was a great study in light and dark and creating depth in a piece. The quilting gives it a beautiful dimension that could not be done with the painting alone. 

I am looking forward to using this process again with more photos and possibly, working with larger photos.

CREATING ALWAYS,

KAREN 


Wednesday, April 20, 2016

ABUNDANCE: It's Finished!


This is the end result of pulling out a piece that I started many years ago in a class.  

This photo shows where I had left off with the piece. It's been quilted and has painted highlights both on the green silk and the canvas background.


You can see that there has been quite a change.  Here are a few of the steps that happened along the way of creating the finished piece. 

I was playing with antique buttons when I found the orange trim stashed in my trim drawer.  I had already cut through the rectangles with a ribbon trim, that I enhanced with leaf beads. I had also added the turquoise beads.  You can see the various trims and beads that I am auditioning for the rest of the piece.


The buttons are now on the sides and there is a green web like trim covering the edges of the the sides and top. An antique belt buckle is serving as a butterfly. Shell leaves are on the green rectangles. Birdnest buttons are placed around and pearl eggs have been placed in one of them.


Things got changed. You can see here how things got moved around. Lots more beads were added to the piece; leaves, and pearls for sure.  An old pin of mine from the 1960's makes a nice leaf accent. There are also some bird buttons and more turquoise. Watercolor pencils were used to increase the depth of the quilting lines in the background.


I ended up mounting the piece on a 12"x 24" piece of canvas. I painted the canvas to compliment the piece, before I glued the piece to the canvas. 

After applying the piece to the canvas, I then stamped on the fern and little circles.  


Sometimes a project just has to be left alone to mature and be finished when the time is right. That's what happened here.  I have put a lot of years of experience into finishing this piece. 

It's been fun to pull out stuff from collections and to pull out techniques that have been used on other pieces and to put them all together.

Creating Always,

Karen


An old Chinese proverb says, “Do not grasp the brush before the spirit and the thoughts are concentrated.” 

But if you do, know that it can be set aside until the spirit and the thoughts can be concentrated.

Monday, March 28, 2016

MOVING HAY IS LIKE SEWING


So, last night my husband taught me how to release the loader bucket from my new tractor and load the hay bale spear.  He then taught me how to pick up and move one of the big round hay bales. 

As I was trying to get the spear in just the right spot, at just the right angle and then get it all lifted into the air, it occurred to me that it was a lot like using a sewing machine.
After all, when one is sewing there is a lot of lifting of the presser foot and placing the needle back down in just the right spot. This is especially true when doing a lot of free motion quilting. There are lots of stops, turns, ups and downs. Never mind how we are also using our foot to run the machine at just the right speeds, lift and lower the needle and do whatever else our particular sewing machine pedal will do for us. 

All in all, there is a lot of hand and foot to eye coordination  going on all of the time. We work with patience and precision. Oh yes, and we also have to remember to breathe.

So as my husband was telling me how quickly I had caught on and what a great job I was doing, I just told him that it all had to do with my years of using a sewing machine. He was pretty puzzled by this until I explained what I've just pointed out here.

It looks like my three great creative loves of quilting, gardening and cooking are all coming together to support me in which ever one I am engaging in at the time. 
 
 This all makes me think that all of my life is intertwined at every step. I just have to be awake enough to notice it and make use of it.  I'll remember that while I am spreading those five big bales of hay on the garden this week.


 Loving my new tractor along with my marvelous sewing machine,
Karen

Monday, February 29, 2016

MAKING SPACE


The other day I had just finished reading a short essay, by Tosha Silver, that was in her book OUTRAGEOUS OPENNESS, Letting the Divine Take the Lead, when I received the clear message that today I would finally clean out the three draws in the Hoosier Cabinet.  The essay was titled "The Energy Vacuum" and discussed getting rid of clutter and things that might be useful but they are no longer useful to oneself. As a result, they suck up our energy and take up creative space in our lives.

Now, I had already been been going through the house and even the studio and getting rid of clutter on a pretty regular basis, for the last several years. I thought I was doing a pretty good job but I really knew better. 

I knew those drawers needed a good going through.  I received a very clear message that " today is the day to clean out those three drawers".  I groaned at the thought of going through all of the stuff that had accumulated in them over many years. While I have kept all the other drawers in the kitchen free and clear of clutter, those three continued to lurk in that corner of the kitchen, weighing me down every time I thought of them, or had to try to find something in one of them.

So, I found a cardboard box and emptied the first drawer into it. I figured that I would only put what was needed and/or wanted back into the drawer.  It all went surprisingly smoothly and by time I tackled the second drawer, I had decided on a strategy for reorganizing the drawers.  I also had a pretty good size box of stuff for Goodwill and the trash can was filling up.

The third drawer is the big one, in the photo at the beginning of this column.  I was shocked at some of what I found in there. A newspaper from 1988 was lining the bottom and there was a can of shoe polish that might have been from Steve's army days, back in 1967 to 1971. Yes, very old and molded. 

I only found two items that are still useful and they are now put in a more appropriate place.  I finished filling the trash can, wiped out the drawer and put it back in the cabinet empty. It's going to stay that way.

I did feel a huge sense of relief at getting rid of all that stuff.  I  had not realized how much those lurking drawers were affecting me until I had dealt with them. The more I got rid of, the lighter I felt. 

I also am left wondering why I let them get so filled with clutter but that's probably another subject for another time. I can now enjoy opening a drawer and finding what I need.  Most of all, it's opened up space for something new to now appear in my life.

I've been using this same approach in the studio. I realized that I haven't been really excited about creating anything new.  I started looking around at some of the unfinished projects from years back and felt weighed down by them.

I know that sometimes it's best to just give up on a project; that not all beginnings are meant to have an end, but these were things that I wanted to try finishing. Some of them I really liked and others are a creative challenge that still looks like fun.  I've  decided to open up space by finishing those projects that still appeal to me.

One of them is a collage that I started many years ago at a KHQS Getaway. 


I got as far as painting the background and the three green silk rectangles, and then set it aside.


Here I've accented the quilted lines with brown shades of watercolor pencils and added more paint to the green silk rectangles. I've also found a collection of antique buttons, pearl leaves, turquoise and a belt buckle.


It was looking a bit plain, so, I decided to check out the trim drawer.  


After applying the trims, I decided to add some beading.  

Things are coming along. More is being added and I'm feeling a bit of energy coming back into the studio.  A project is about to be finished up that I'm really liking while I'm having fun finding and using things up and making room for something new.  

Hopefully, I'll be posting the photos of the finished piece in a few days. 

To paraphrase Tosha Silver, "when we let go of what we don't need, what we do need can then arrive."  

I'm opening up space and inviting in more creative energy.

Creating Always,
Karen 


Friday, February 5, 2016

FRACTURED GRAPES- Translating a photo into a quilted piece


This photo was issued by the Quilt Artists of Kentucky as a challenge. We were to translate it into a 12" square quilted piece.  I chose to print parts of the photo on fabric and go from there.

I started by cropping out the leaves and only printing the grapes on a 8"x10" piece of paper.
Here's the photo that I printed.


I then cropped out the leaves and printed them as narrow strips on paper.


I then sliced up the blueberries and alternated them with the leaf strips. I realized very quickly that I had over sliced the blueberries. So, this gave me a preview of what slicing up the printed fabric might look like.


I ended up slicing the pieces like so:


You can see that I reversed the inner leaf pieces and made the last grape piece larger. I also reduced the size of the dark red leaf border on the left.

I sewed all of the strips together and then squared up the piece.  I knew I needed borders on the top and bottom to make it 12"square. I found a piece of snow-dyed cotton sateen ( I had dyed 40 yards of cotton and silk fabric during the big March storm of 2015, so, I just happened to have something that was perfect for the borders.) and cut the borders out of it.


I then started quilting it.  I first outlined the grapes with Madiera FS20 Metallic thread.  You can see that the quilting has added real definition to the grapes. 


Then I quilted the leaves using a free motion veining design. 


Once I had completed most of the quilting, I started painting the grapes with Inktense Watercolor pencils. I was excited about seeing what kind of difference they would make on the grapes.  I colored in each grape and then brushed it with Golden Fabric Medium- GAC 900.  The medium caused the colors to flow and to heighten in intensity.  It's also easy to add in more color while the medium is still wet and easier to see where shading or highlighting might be needed. 


After letting the grapes dry overnight, I finished the rest of the quilting and proceeded to color in the rest of the piece.  The borders were covered with Fabric medium mixed with paint pearls by Jaquard.


I finished off the grapes with a slight coating of gold metallic Tushineko Ink, that gave the grapes a lovely frosted look.


I am going to try printing and painting again. I really love working with the watercolor pencils. I've also discovered that I can use Prismacolor and other brands of watercolor pencils that give the same effect and allow me to work with a broader range of colors.  I'm also excited about adding in details with ink pens. No telling where this will all go.

Off to a night on the town with the husband and friends,
Enjoy,

Karen