Monday, March 4, 2019
Tuesday, January 29, 2019
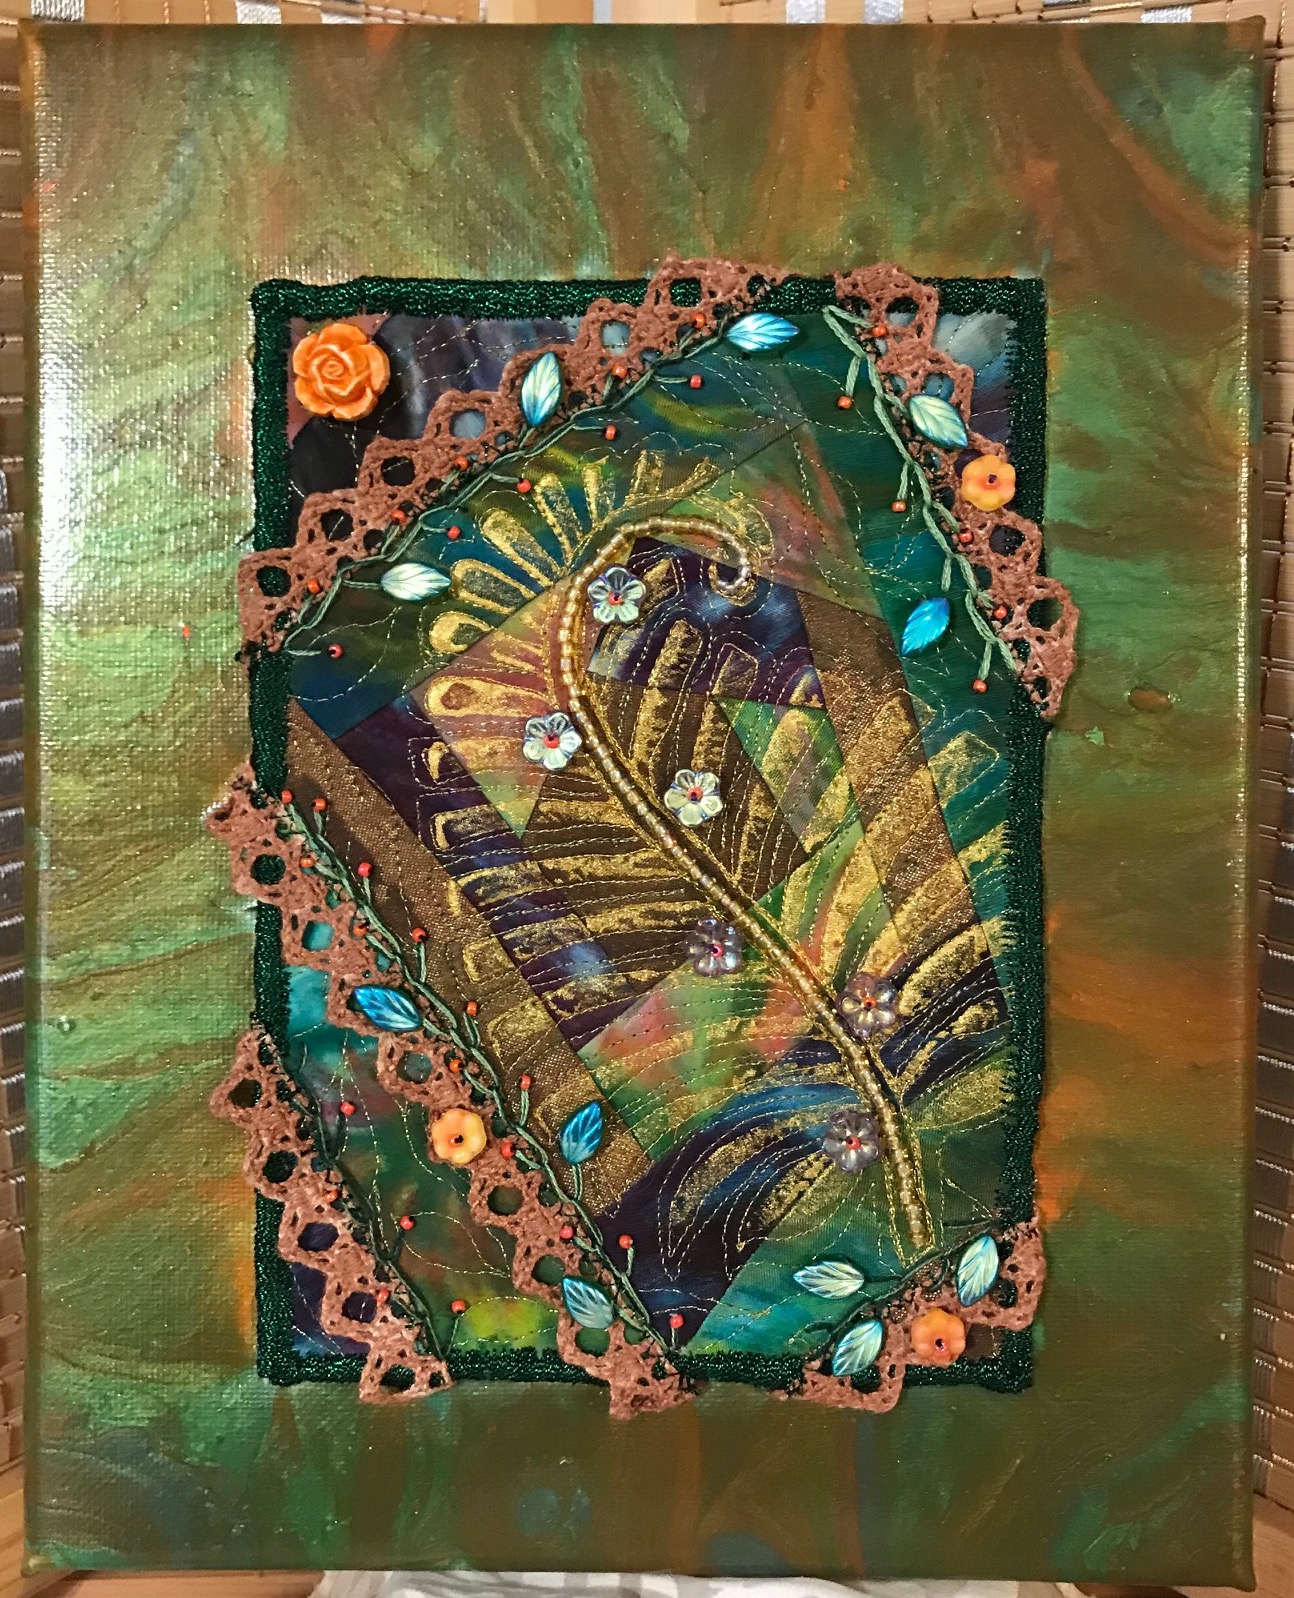
"WHAT IF" Challenge for Quilt Artists of Kentucky
Last Spring, I got the idea for a Challenge fund raiser, for our Quilt Artists of Kentucky Guild that would involve selling kits, made up of various pieces of fabric and trim found in my studio and that of a fellow Art quilter. This photo shows 4 of those kits.

You can see my kit in the lower left corner of the above photo.
The challenge was to use part of everything in the kit and see what the artist would create going along with the idea of "WHAT IF" I do this or that with these items. "What If" I add in another medium or embellishment. The finished piece could be 8"x10" or 5"x7" and had to be mounted on a 8"x10" canvas.
I got the idea from someone asking me how I create. They wanted to know if I fully plan a piece or create as I go. I said that I start with a basic inspiration or idea and then ask myself "WHAT IF" as I design the piece.
This is a photo of the beginning of my piece. It started out as a 5"x7" Crazy square.

After doing the Crazy Piecing, I decided to see "What would happen If I enhanced the fabrics with watercolor pencils. I used Derwent Watercolor pencils and Golden gac 900 fabric medium.
I really liked the richness of color that resulted. I then stamped a fern design into the center of the piece. I used Gold metallic paint.
 |
Fabric enhanced with watercolor pencils and stamped with gold metallic paint using a TaTa wood block stamp. |
There was a piece of hand crocheted lace trim in the kit. I thought about attaching it with hand embroidery or beading. I ended up doing both techniques after I painted it with Tsukineko bronze ink and sewed it into place by machine.

After the paint had dried, I free motion quilted the piece using gold metallic thread. I quilted in a vining leaf pattern and outlined the fern. The edge is finished with a satin stitch using Madeira FS20 metallic thread.

I then sewed down the painted lace. The ink was nice because it did not cause the lace to become stiff.
The above photo shows a detail of the embroidery and the start of the beading using leaf beads and glass seed beads. The center of the fern is beaded with gold 6/o beads.
Here is a photo showing all of the beading. The piece is ready to be mounted onto an artist canvas.

I "pour painted" the canvas. Just as the paint was setting up, I pressed the piece into the paint and held it there until it adhered to the canvas.
Each artist can finish their canvas either with paint or fabric. Even though the pieces can vary in size, I set the canvas size at just 8"x10" so a show of the pieces will hang better together and be easier to hang.
I really love the way this "WHAT IF" project came out. Since I was starting out with the materials already decided for me, it became a good exercise in letting go and letting the design process just happen.
There will be a show of the finished pieces at our Kentucky Heritage Quilt Society Getaway in June. I'm excited about seeing what everyone else has done. I know it will be very interesting.
Creating Always,
Karen
Tuesday, May 1, 2018

I've been playing with an old, foundation strip piecing pattern that some quilt buddies shared on our KHQS Facebook page. It's really a fun process that lends itself to a lot of adaptation.
The original pattern was based on using a 7" square foundation block and strips that are cut anywhere from 1 1/2" wide to just 3/4" wide. Length does not matter. I found that that it was best to have a wide variety of strip widths.
I also used a large variety of cotton prints and a few cotton backed lame' solids that were from a workshop, that I took way back in the last century.
To start, you need to cut 7" blocks from a good background fabric. I chose two different black prints as the starting point. At the time, I thought that would be all I would do. As you can see, in the photo, I did end up using some blue prints in the border that I decided to add.
The foundation blocks were marked as follows: Mark 3" from the corner and draw the line to the opposite corner. Mark 3" on the other side of the corner and draw the second line to the opposite corner.

Lay the first strip of fabric down along one of the lines and sew it using a 1/4" seam allowance.

Flip the strip over and press it into place either with an iron or finger press it. Lay the next strip onto of it and sew again. Repeat this process until the strips go all the way to the corner.

Now repeat the process on the second line. This photo shows the adaptation I made from working with a square to a rectangle. The rectangle was 5" by 7".

Four of these blocks go together to make one block of the quilt top. This photo shows four of the square blocks put together. Notice that the strips do meet up together. Because they are all different widths, they are not meant to meet in straight lines. That really makes for super easy piecing.
The only seams that need to meet are the four straight seams when you sew the blocks together.

Once I got all several of the blocks made, I started playing with placement and deciding how many more I would have to do.

I started putting the top together in sections. I had to leave it up on the design wall to make sure everything went together in the right place. I would take a section down, piece it and then do another section.
The border blocks were cut as squares and rectangles in order to keep the piece from being too long in relation to the width, which is one of the hazards of working with rectangles.

Once the whole top was laid out and partially pieced, I started wondering about a border that was completely different from the rest of the top.
I started pulling out cloud and star fabrics and anything that seemed like starlight. In order to make it look symmetrical, I had to add in some of the new fabrics to the black border, which meant, that I had to unsew parts of the finished seams.
Fortunately, I discovered this part before I had sewed the rest of the top together.

I had a really good time going through all of my quilt incubator baskets and picking out fabrics for this quilt top. The studio was rather covered up in cut strips for awhile, with the incubator baskets sitting everywhere.

So that's all there was to it. I now have lots of strips left over that are incubating until the next idea comes up for using them.
I am really looking forward to quilting this piece. I can see lots of metallic thread on that dark background. Lots of fun for sure!
Creating Always,
Karen
x


I started pulling out cloud and star fabrics and anything that seemed like starlight. In order to make it look symmetrical, I had to add in some of the new fabrics to the black border, which meant, that I had to unsew parts of the finished seams.


Karen
x
Monday, February 12, 2018
BEGINNINGS: A quilt Metamorphosis Story, Part 1

I pulled out one of my "quilt incubators" last week. It was full of fabric that I had dyed and was just waiting to be put into a quilt.
Here's a few of the pieces that I started with. They were hand dyed silk blend fabrics.

My idea was to create a patchwork background that would then metamorph into a circular piece that would be a symbol "for all life being one life."
I started by cutting various fabrics into strips and weaving them into a square piece. The fabrics were back by Misty Fuse, so, as I was weaving them, I could fuse them into place. Once the weaving was finished, I cut the piece into a circle and layered it onto a background.
I then pulled out another "quilt incubator" and started playing with glitzy, yet see through fabrics that would be layered over the circle.

I cut the glitzy fabrics into circles and layered them over the woven piece. I then satin stitched them down, using various metallic threads.

Once that was done, I started quilting inside of the circles, again using metallic threads. I'm using three different colors of thread and fabric. Each of the different colors has its own quilting pattern.
The patterns overlap just as the circles overlap.


I will be adding more circles that are cut out of a gold lace material. They will go around the edge of the quilt.

The whole idea is to build up the individual layers to represent how each aspect is individual but that the individual is also one with all of life.
I hope to finish the quilting this week and start on the embellishments soon.
Until next time,
Create with Quilting,
Karen
Monday, February 5, 2018
"LAVISH ABUNDANCE" and Journaling

LAVISH ABUNDANCE
2017 was quite a year for creating in the studio. I was very excited about creating this quilt that I call "LAVISH ABUNDANCE". Once I had it done though, I got busy with gardening, going on a great trip to Costa Rica with my husband and lots of other things that kept me from writing a journal page about how I created this wonderful piece.
I started a quilt journal several years ago. So long ago, that I did not have a digital camera. I did have a computer so I could write and print from there. Many of the photos were taken back in the 1970's and 1980's. I think every quilt artist should keep a journal of their work and, of course, sign their work in a way that it cannot be removed.
For too long, quiltmaking was seen as something that women do either to "make do" or to "have something to do", but not as the art that it is. Quilters didn't even sign their work most of the time because it wasn't "real art".
Fortunately, more and more quilters are signing their work now and that's good. I also encourage quilters to keep a journal of their work. A journal page can be a simple one page description of the quilt or it can be several pages describing the process and design inspiration that went into creating the piece.
I have done both. My earliest pages, many of which were written several years after I had made the quilt, were set up with a photo of the quilt, then a description of the pattern used and the colors of the quilt, plus any little stories about why I made the quilt or who I made it for. That was back when I was making traditional pieced and hand quilted quilts, and I could not do close up photos of the details. Nowadays, it's very easy to take great photos with my iPhone.
My journal pages are usually much more complicated now. I am adding in more photos and more details about technique and materials used. I'm also taking more step by step photos of the construction process. Part of the reason for this is that the art pieces are more complicated than the traditional quilts that I used to make and the materials are more varied in fiber content and often include things such as beads and paint.
Here are some pages in the quilt journal about this quilt.


Whenever possible, also be sure to include a photo of yourself with your creation. It is always fun to go back through your journal and not only see a progression in your work but also see what you were like at that time. It's also important historically should anyone every have reason to have your work appraised after you are no longer around to talk about it.
I'm getting ready to start a new quilt. I've decided that this time I will also start the journal pages. Hopefully, by time I finish the quilt, I'll also have the journal pages finished.
Creating Always,
Karen
Tuesday, January 16, 2018
NONESUCH BIRDSONG STUDIO: INKTENSE WATERCOLOR PENCILS AND an OLD QUILT
NONESUCH BIRDSONG STUDIO: INKTENSE WATERCOLOR PENCILS AND an OLD QUILT: SPRING HAS SPRUNG designed by Karen S Riggins, 1995 Paper pieced and applique This photo shows the quilt on top of a Nine Pa...
INKTENSE WATERCOLOR PENCILS AND an OLD QUILT
SPRING HAS SPRUNG
designed by Karen S Riggins, 1995
Paper pieced and applique

This photo shows the quilt on top of a Nine Patch that I made in 1979 out of double knits and othe fabrics. I machine quilted it a few years ago when it needed a new back.
I recently pulled out a small art quilt that I had made from a paper pieced pattern of my design, in 1995. It hung in our garden room for a long time, until I realized how faded it was getting to be. Not knowing what to do with it, I stored it away in the pie safe where I have other quilts stored. When I got it out this last time, the thought occurred to me to try bringing it back to life by painting the fabrics with watercolor pencils. That's all I was going to do, was use watercolors to bring back the color in the fabrics.
I used a combination of Derwent Inktense Watercolor Pencils, cheaper watercolor pencils and Prismacolor Pencils along with a fabric medium made by Golden products, GAC 900 medium. The medium intensifies the colors and blends them while also sealing the paint.
Here's a photo of the quilt partially painted. It's already starting to look much better.

This is a small quilt, only about 20" square, so it was easy to think about painting the flowers. That said, it's such an easy process and one that does not destroy the original integrity of the fabric, that it might be something to consider doing to a larger quilt that is faded but still in great condition.
There is one issue that needs to be paid attention to and that is, making sure the paint does not bleed into the background fabric. It just means being very careful with the medium when brushing it over the paint.
Here's the quilt after all of the painting was finished.


This photo shows detail of the painted flowers.
At this point, I tossed aside the idea of only painting the quilt and decided to quilt over the original quilting with metallic thread and to add in some beading detail.

Here is a closeup of the flowers after being quilted with the metallic thread and beading added to them.
Here's the completely finished quilt:

I highly recommend this little quick fix for any quilt that you still love but that is looking a bit faded. I really love this piece now. It looks like "Spring has Sprung" again newer and better.
Creating Always,
Karen
“Natural focus occurs when the mind is interested. When this occurs, the mind is drawn irresistibly toward the object (or subject) of interest. It is effortless and relaxed, not tense and overly controlled.” (W. Timothy Gallwey)
Subscribe to:
Posts (Atom)